SESO Operational Handbook
This handbook encapsulates the entire breadth of SESO's knowledge. Every training document, policy, and procedure is defined and linked from this page.
Terminology
| Term | Definition |
|---|---|
| SOP | The standard conduct that every member should follow. |
| Role | The expected behavior of a member. Can be used to refer to a member's billet, rank, or position. Members can have multiple roles. |
| Billet | Temporary role assigned to an operative during an operation. Represents the operative's in-game unit. Only one billet can be assigned per operative. SL, R, S are examples of billets. |
| Rank | Indefinite role assigned to a member. Represents the member's experience in the unit. Only one rank can be assigned per member. Combat Service Support, Contractor, Operative are examples of ranks. |
| Staff | Indefinite role assigned to a member to identify their administrative responsibilities. Multiple positions can be assigned per operative. CEO, SME, H2 are examples of positions. |
Culture
The mission of the SESO unit is to provide a PMC MilSim experience focused on convenience, cooperation, and camaraderie.
- Convenience: We strive to use your time wisely. Processes are streamlined with scripts, online services, and SOPs to maximize the potential fun.
- Cooperation: Every experience should rely on TvE cooperation and socializing with other members. This is opposed to competitive experiences, like TvT, and run-and-gun gamemodes, like King of the Hill.
- Camaraderie: At the end of the day, we are a group of friends. We volunteer our time to this unit to foster a friendly environment for everyone.
- PMC MilSim: SESO simulates the military and administrative processes of modern private military companies. Every person enjoys the simulation and plays according to the role they are entrusted. We are not simulating a single company. We blend real-world militaries, PMCs, and personal preferences to create a simulation that appeals to us.
Rules
SESO's rules are divided into two sections: universal rules and operational rules. Universal rules apply on all systems belonging to SESO including non-Arma projects. On top of the universal rules, the operational rules apply to all Arma 3 operations. Operational rules apply the moment a member joins the server until the end of debrief.
The administration of SESO may take action against you even if it does not initially seem you broke a rule or if you did not break a rule at all. This group does not operate under the idea that you will get away with breaking the spirit of these rules because of an unintentional oversight.
Universal Rules
Harassment
Harassing, insulting, bullying, belittling, or nonconstructively criticizing other members is not permitted. One is allowed to share their opinion, jokes, and banter as long as it does not inflame other members. If in doubt, always ask others if they feel they are being harassed.
It is not necessary for the victim to consider behavior as harassment. Any member could consider your behavior as harassment and report it to a Concern Form.
Malicious Files / Links
Posting, hosting, or distributing files/links that can potentially damage a member's computer is not permitted. Likewise for files/links that can “dox” or reveal personal information of members without their explicit permission. This applies to Discord, Teamspeak, in-game chat, and any other public or private channels where files/links can be distributed to other members.
Explicit Media of Death / Gore / Pornography
Posting, hosting, or distributing any explicit media showing, or depicting death, gore, or pornography of human beings, or other living beings is not permitted. This applies to Discord, Teamspeak, in-game chat, and any other public channels where media can be distributed to other users.
Operational Rules
Disruptive Behavior
Behavior such as griefing (intentionally failing the mission), fragging (intentional friendly fire), and threats (threatening to frag) are considered disruptive to SESO operations. There are no excuses for this behavior including anger, banter, distrust, retaliation, or apathy.
If you witness disruptive behavior, inform your leader or submit a Concern Form. Retaliating to fragging with friendly fire is still fragging and only makes your perspective dubious.
Mic / Music / Sound Effect Spam
Spamming, or repeatedly emitting unsolicited words, noises, music, or sound effects (such as from sound boards), at any point in an operation is not permitted. A member may play sounds or music as long as they can immediately stop it at the request of any other member.
Multi-roling
Every operative performs a duty according to their billet. This fosters a cooperative environment where coordination is essential for survival. An operative should not be able to complete the duty of every role alone and should stick with the equipment relevant to them. If you are a MG, stick with an MG, do not grab AT. If you are a R, do not carry a mine detector. Exceptions are:
- Last Resort: You may use equipment meant for other roles as a last resort. If you are facing a tank, and your AT specialist is unconscious, and then you may use their launcher as a last resort.
- Combat ineffective: If your primary weapon is black on ammo, you are rendered combat ineffective. In that case only, you are able to wield enemy weapons.
For leadership, be sure to leave planning to leaders. If you wanted a different plan, you should have volunteer as a leader. If you delay planning or agitate the leader, you may be removed during an op. Debrief is the only time to go over leadership feedback as it allows for a calm environment for everyone to suggest improvements.
Vehicle Operation
As an operative you are only able to operate vehicles that are relevant for your billet. Unlike the multi-roling policy, there are no exceptions to this policy.
Cavalry are able to operate all vehicles. This includes armoured vehicles and aircraft. All other billets are able to operate motorized vehicles such as trucks, technicals, and cars. As rule of thumb, if the vehicle has a steering wheel, it can usually be operated by non-cavalry billets.
Non-cavalry are allowed to sit inside any vehicle as passengers.
Progression
When a person joins the SESO Discord, they are immediately met with the pre-join questionnaire. They can select between Combat Service Support or Contractor roles. CSS are SESO members exclusively interested in playing non-Arma games with other members. They stay at the same level as a Contractor at any time they are CSS.
Contractors want to participate in SESO's operations. The CEO will reach out to Contractors first. If time allows, they will start the on-boarding process.
Ranks
| Rank | Full Name | Privileges | Requirements |
|---|---|---|---|
| O3 | Senior Operative | Able to become a host. Able to Lead. All privileges from O2 are included. | Pass Lead probationary, pass BIC, and deploy 8 times. |
| O2 | Standard Operative | Able to receive the Medical, Cavalry, Logistics, Scout, Lead certificates. All privileges from O1 are included. | Pass BIC, and deploy 4 times. |
| O1 | Junior Operative | All privileges from OC are included. | Pass BIC, and deploy 1 time |
| OC | Contractor | Can volunteer as generalist billets such as R, G, MG, and AV. | None |
O2 is the most common rank. Once you reach O2, you earn the most of the privileges offered. Further progression is available in cert schools and operations department.
Basic Infantry Course
See Basic Infantry Course for a written version of the BIC.
The BIC is led by the CEO for any prospective contractor. The BIC is not required. You can indefinitely deploy as the available infantry roles. You could even deploy to an operation before your BIC. Yet, it is heavily suggested for everyone to attend BIC and gain a better sense of the unit's culture.
The BIC is divided into sections which align with sections of this handbook. The first 4 sections are Culture, Structure, Communication, and Infantry Tactics. There is also an optional section for Basics such keybinds and game settings. Any section may be skipped if the instructor deems the Contractor to already be familiar.
Certificate Schools
See the Weekly Training Interest Form to request training in certificates.
Certs are available as another method of progression. They are optional and only required to volunteer as specific billets. Billets that require certs are called specialist, as opposed to generalist. If you wish to volunteer as these roles, you need the appropriate certificate. You can possess multiple certificates simultaneously.
| Billet | Cert Required |
|---|---|
| Platoon Leader | Lead Cert |
| Team Leader | Lead Cert |
| Medic | Medical Cert |
| Logistician | Logi Cert |
| Scout | Scout Cert |
| Cavalry | Cav Cert |
After you earn a cert in a school, you may be eligible for an instructor role. Reach out to the appropriate SME on how to get started as an instructor.
Certs rarely expire. Once you earn a cert, you can keep it indefinitely. In rare cases, SMEs may announce re-trainings for a cert due to a policy change, tactics change, or equipment change. Your cert may be removed if you fail to attend the re-training.
Certs are always liable to be removed or modified according to the SME's discretion. When volunteering for a specialist billet, you are responsible for performing well to the cert's SOP. Failing to address feedback and failing to follow the cert's SOP are common reasons to attend re-trainings.
While a school can have multiple certs and instructors, the SME is the primary authority for the school. All school documentation is written and enforced by the SME. The SME reserves the right to remove or change your cert according to the cert's SOP.
If you believe an SME to be unfair or unprofessional, message the CCO with your concerns.
Eras
SESO operates in all time periods between 1930 to present times. We divide them into three eras:
- MWE: Set in the 1990+ time period.
- CWE: Set in the 1960-1989 time period.
- WWE: Set in the 1930-1959 time period.
Each era has different technological limitations. In most cases, expect the following:
| Technology | Available in MWE? | Available in CWE? | Available in WWE? |
|---|---|---|---|
| LRR | Yes | Yes | Yes |
| SRR | Yes | No | No |
| RTO | No | Yes | Yes |
| GPS | Yes | No | No |
| BFT | Yes | No | No |
| NVGs | Yes | Yes | No |
| Personal Armor Vest | Yes | Sometimes | No |
| Helicopters | Yes | Yes | No |
| Man Portable AA | Yes | Yes | No |
| UAVs | Yes | No | No |
Our tactics, policies, and organization remains the same through all three eras. This saves pages on this handbook and in our infantry courses. We care more about keeping an intuitive SOP than redefining it for every era for the sake of historical accuracy. In the case of technological limitations that require new procedures, such as CWE and WWE necessitating the RTO billets, they may be merged into our existing SOP. There are rarely limitations that require more procedure changes.
MWE and CWE often share the same factions and maps, usually sourced from CUP mod. WWE includes IFA3, CSA, and possibly EAW mods depending on the terrain.
Organization
SESO is organized into two divisions: Corporate Division and Security Division. The Corporate Division includes the Executive Board, Operations Center, and Tech Center. The Security Division includes the COC and the Certificate Schools.
The Corporate Division includes positions outside of operations. The CxOs, Operations Center, and Tech Center make up positions that help support and execute the CEO's mission through administrative duties.
The Security Division includes positions and billets that directly affect operations. Billets make up the COC, a temporary hierarchy that exists due to an operation.
Executive Board
Members of the Executive Board perform administrative duties for SESO. They support the missions of the unit through the creation and maintenance of policies, systems, and trainings. The CEO drives the CxOs towards supporting the unit's missions. However, CxOs are encouraged to coordinate with one another to satisfy mission requirements.
All members of the Executive Board follow the naming scheme of Chief X Officer and generically referred to as CxOs. Each CxO has their own list of missions. In most cases, vacant positions within the Executive Board are fulfilled by the CEO.
Rule of Non-Intervention
All CxOs hold sole authority for their field. Sometimes, overlapping jurisdictions can occur. To prevent conflict between CxOs, the Rule of Non-Intervention applies the following:
No CxO should intervene in the responsibilities of other CxOs and their jurisdictions regardless of their intent. Exceptions are:
- The responsibilities of the CxO are inherited due to a CxO LOA
- The appropriate CxO(s) has given explicit prior permission to perform definitively
Chief Executive Officer
Also known as CEO, manages the Executive Board and drives the unit towards an overall vision.
They are the leader of the unit. They possess access to all parts of SESO and are able to support any position. Though, many responsibilities belong to other CxOs.
Missions
- Settle critical decisions for the unit
- Select CxOs for the Executive Board
- Manage and assist other CxOs in their own missions
- Maintain SESO Mission Framework
- Invest funds towards the unit
When on LOA, the CEO's responsibilities are inherited by the highest available CxO listed on this board. Usually, their responsibilities are inherited by the COO.
Chief Operations Officer
Also known as COO, manages Operation Hosts and all aspects of operations.
SESO's bread and butter are our operations. The COO ensures their quality and proliferation. This includes all aspects both the technical, such as the server panel and mod configuration, and the design, such as storytelling and time management.
Missions
- Promote passion in the mission design and storytelling of SESO
- Ensure utmost quality of operations within SESO, using Hosts and the server infrastructure as the foundation.
- Maintain a respectful reputation of SESO's hosts and their operations to attract new hosts
- Improve accessibility to operations through use of scripts, engaging gameplay, and intuitive systems
- Provide a varied set of mods and tools for Hosts to enhance operation quality and improve operation hosting efficiency
- Coordinate unit-wide changes with the Executive Board to support these operations
When on LOA, the COO's responsibilities are inherited by the highest available CxO listed on this board. Usually, their responsibilities are inherited by the CEO.
Chief of Human Resources Officer
Also known as CHRO, manages these rules and solves interpersonal conflicts.
Any community is dependent on its cooperation and friendliness. The CHRO attempts to settle people's differences through the enforcement of rules. Additionally, they can act as mediators in conflicts. They are essential in keeping SESO a friendly environment.
Missions
- Maintain respect between members through enforcement of unit rules
- Update unit rules in accordance with our current climate
- Update game rules in accordance with our current climate
- Resolve interpersonal conflicts between members to minimize disciplinary action
- Performing disciplinary actions to address CC
When on LOA, the CHRO's responsibilities are inherited by the highest available CxO listed on this board. Usually, their responsibilities are inherited by the CEO.
Chief Compliance Officer
Also known as CCO, manages all Certificate School training, documentation, and SMEs.
Missions
- Support Certificate Schools and their SMEs to proliferate certificates to operatives
- Standardize trainings between certs to maintain consistent quality of knowledge
- Update the SESO Wiki to ensure convenient access to the latest cert documentation
When on LOA, the CCO's responsibilities are inherited by the highest available CxO listed on this board. Usually, their responsibilities are inherited by the CEO.
Chief Technology Officer
Also known as CTO, manages Arma 3 servers, unit websites, and other unit technologies
Like this wiki, SESO hosts a variety of services that depend on our central infrastructure. The primary warden of our technology is the CTO. While other roles use SESO infrastructure to fulfill their missions, the CTO's missions revolve around the infrastructure itself.
Missions
- Help CxOs meet their mission needs by providing technology services and assistance
- Ensure utmost quality of the infrastructure backend for efficient use of resources
- Promote our public image through technical means such as the SESO website
- Centralize projects and developers under CTO's jurisdiction for quick and efficient decision-making
- Improve existing workflows through automated systems such as Kakapo's cogs
- Uphold security of server infrastructure via access to sensitive and powerful backend interfaces such as SSH
When on LOA, the CHRO's responsibilities are inherited by the highest available CxO listed on this board. Usually, their responsibilities are inherited by the CEO.
Chief Gaming Officer
Also known as CGO, manages non-Arma 3 game servers.
While SESO is mostly focused on Arma-related content, there is occasional demand for other games. The CGO meets these demands by hosting other games and managing community game sessions. They serve the community on an ad hoc basis depending on the requests that come from operatives. In other words, they may be multiple games hosted at a time or none at all depending on the trends of the unit.
Missions
- Promote comradery and respectful attitudes through cooperation and friendly competition in games
- Authorizing game servers based off the interests of operatives and capabilities of the server infrastructure
- Maintain an intuitive and equal access to game servers for all operatives
- Coordinate with the CHRO to enforce and produce relevant rules
- Ensure utmost quality of games through operation of the server infrastructure
When on LOA, the CGO's responsibilities are inherited by the highest available CxO listed on this board. Usually, their responsibilities are inherited by the CEO.
Chain of Command
The COC is the temporary hierarchy caused by an operation. The moment an operative volunteers for a billet on a roster, they become part of the COC. Each operation has its own COC and each COC is separate from one other.
The PL is the head of the COC and every EL are subordinate to them. While COCs are temporary, ranks are used to indicate the member's experience with the unit. Higher ranked operatives often have access to more billets than lower ranked operatives depending on the courses they have taken.
Host and Co-Host billets also belong to the COC. They usually represent the higher HQ or VIP relevant to the operation.
Order of Battle (ORBAT)
The COC SESO follows NATO doctrine, with some modification to fit the reality of Arma 3 units.
| Element Name | Size | Leading Element | Subordinate Elements |
|---|---|---|---|
| Platoon | 7 - 17 Operatives | None | x2 Squads and any Detachments |
| Squad | 5 - 6 Operatives | Platoon | x2 Teams |
| Team | 2 - 3 Operatives | Squad | None |
| Detachment | 2 - 3 Operatives | Platoon | None |

In short, a platoon is made up of 2 squads and any number of detachments. Specialists like L and RTO are usually included in the command element.
Kit Regulations
Every billet comes with a pre-defined kit, or list of equipment, at the beginning of an operation. Operatives are able to modify their kit to best suit the needs of their role and their squad using the ACE3 Arsenal. Regulations dictate the equipment permitted for particular billets.
To encourage cooperation, every squad is limited to the equipment they can wield. This is known as kit regulation. While you may customize your kit according to your billet, it is up to the EL to customize their element within the confines of the SOP.
Generally, the equipment available to a squad is defined by the host. The Platoon has to make due with the equipment made available. For example, G billets are available if they are created by the Host.
Regulations do not apply to enemy equipment. As per the Operational Rules, enemy equipment are only permitted when an operative is combat ineffective towards immediate danger. If you are assigned a low-powered scope, you stick with it. If you didn't start with a MAT, you stay without it.
Every infantry squad is limited 2 LATs regardless of available billets. Follow the LAT Totem Pole on who should be prioritized to carry LAT launchers. You will usually see R and EL with LAT launchers.
LAT Totem Pole
An EL can assign any billet a LAT launcher. Follow the LAT Totem Pole on who should receive it first, with the most prioritized billet at the bottom.
- Medic
- Logistician
- Machine Gunner
- Grenadier
- Element Leader
- Rifleman
Other billets not mentioned are restricted from carrying LAT.
Permitted Scopes
Most billets are permitted scopes with magnification up to 4.0x. MG are permitted scopes with magnification up to 6.0x, usually due to the caliber of their MMG. S are permitted scopes with any magnification.
Billets
A billet represents a specific unit of the COC. This includes anyone from the R to the SL and to the Host. The roles available in the COC are decided by the roster posted by the Host. These rosters are FCFS and limited so the list of available billets can vary. Ultimately, the Host decides the available billets for their operation. After step-off, you are committed to the billet you volunteered.
In this handbook, every reference to a rifle includes carbines, SMGs, and shotguns as their application overlaps.
Squad Balance
Hosts and ELs are responsible for organizing a balanced squad. To balance a squad, make sure there are no more than 2 of the same billets per infantry squad. This balance does not apply to detachments. There may be any number of Riflemen in any squad.
Every squad should have no more than 6 operatives including the leader. If there more than 6 operatives in a squad, the latest joining volunteers should be assigned to a smaller squad, attached to the platoon as a detachment, or asked to volunteer for a different billet.
As with most policies in this SOH, there may be situations where squad balance is unfeasible. If you are unsure, ask your Host.
Platoon Leader
- Shorthand: PL
- Alternative Roles: None
- Required Cert: Leadership
- Relevant Weapon Classes: GL, Rifle
- Relevant Equipment: LRR
- Maximum Allowed Scope Magnification: 4.0x
- Missions
- Communicate with COC on mission progress
- Lead squads/detachments in the Platoon
Squad Leader
- Shorthand: SL
- Alternative Roles: None
- Required Cert: Leadership
- Relevant Weapon Classes: GL, Rifle
- Relevant Equipment: LRR
- Maximum Allowed Scope Magnification: 4.0x
- Missions
- Communicate with COC on mission progress
- Lead infantry squad of 4-6 operatives
Radio Telephone Operator
- Shorthand: RTO
- Alternative Roles: Radio Operator
- Required Cert: Leadership
- Relevant Weapon Classes: Rifle
- Relevant Equipment: LRR
- Maximum Allowed Scope Magnification: 4.0x
- Missions
- Communicate with COC on mission progress
- Request IDF and supplies from HQ
Grenadier
- Shorthand: G
- Alternative Roles: None
- Required Cert: None
- Relevant Weapon Classes: GL, Rifle
- Relevant Equipment: None
- Maximum Allowed Scope Magnification: 4.0x
- Missions
- Deliver high firepower against soft targets such as infantry and cars
Machine Gunner
- Shorthand: MG
- Alternative Roles: Autorifleman
- Required Cert: None
- Relevant Weapon Classes: MMG, LMG, Rifle
- Relevant Equipment: Spare Barrel
- Maximum Allowed Scope Magnification: 6.0x
- Missions
- Deliver high firepower against soft targets such as infantry and cars
Scout
- Shorthand: S
- Alternative Roles: Sniper, Spotter, UAV Operator, Special Forces, Marksman, Sharpshooter, Recon, Recce, Designated Marksman
- Required Cert: Scout
- Relevant Weapon Classes: SR, DMR, Rifle
- Relevant Equipment: UAV Terminal
- Maximum Allowed Scope Magnification: None
- Missions
- Collect intel through advanced recon
- Perform unconventional warfare and guerilla tactics
- Fire support with high-caliber marksman weapons and CSW
- Maintain high mobility through light vehicles
Logistician
- Shorthand: L
- Alternative Roles: Engineer, Combat Engineer
- Required Cert: Logistics
- Relevant Weapon Classes: HAT, HMG, AAA, Rifle
- Relevant Equipment: Sandbag, Spare Barrel, VMM, Toolkit, Fortify Tool
- Maximum Allowed Scope Magnification: 4.0x
- Missions
- Repair, rearm, and refuel vehicles
- Plant, detect, and defuse explosives
- Deliver high firepower with heavy CSW
- Transport infantry supplies
Medic
- Shorthand: M
- Alternative Roles: Paramedic, CLS, Doctor
- Required Cert: Medical
- Relevant Weapon Classes: Rifle
- Relevant Equipment: Blood Bag, Surgical Kit, PAK, Epinephrine Autoinjector, Morphine Autoinjector
- Maximum Allowed Scope Magnification: 4.0x
- Missions
- Support infantry with medical care
- Transport medical equipment
Anti-Vehicle Specialist
- Shorthand: AV
- Alternative Roles: Missile Specialist, Rocket Specialist, AA Rifleman, AT Rifleman
- Required Cert: None
- Relevant Weapon Classes: LAT, MAT, AA, Rifle
- Relevant Equipment: None
- Maximum Allowed Scope Magnification: 4.0x
- Missions
- Engage hard targets such as armoured vehicles
- Engage soft targets such as infantry and cars
- Engage rotary and fixed-wing vehicles
Cavalry
- Shorthand: C
- Alternative Roles: Crewman, Pilot, Driver, Gunner
- Required Cert: Cavalry
- Relevant Weapon Classes: Rifle
- Relevant Equipment: Toolkit
- Maximum Allowed Scope Magnification: 4.0x
- Missions
- Perform RIF
- Transport infantry
- Provide armoured support
Communication
Being clear, brief, yet precise are vital parts of communication in SESO. Communication is the most important skill any operative can have. The difference between a “bad” operative and a “good” operative is the quality of their communication.
Etiquette
Good communication is more about following an etiquette than a strict set or procedures. It is more important to efficiently and precisely deliver information than it is to p. All procedures are created to serve these principles, and all operatives ought to follow these principles.
- Clarity: Use a clear and loud voice. Enunciate and repeat critical information. Use prowords to avoid ambiguity.
- Brevity: Convey information with as few words as possible. In the heat of combat, long dialogue risks distracting people from their surroundings. Use prowords to communicate with fewer words. Prowords can be used as substitutes for long sentences and phrases.
- Confirmation and read-back: It's important to confirm that you heard orders, so that leaders know that they are being understood. Additionally, it can be helpful to provide a 'read back' of an order to confirm that you fully understand what is being asked of you - this is done by restating what you were ordered to do, so that the person giving the orders can confirm that you heard them correctly.
- Alerting and identifying: Alerting is the act of using key words to get the attention of people before you start saying something important. For example, a squad leader might say “Squad, listen up!”. Identifying is the act of saying who you are and who you're trying to contact when speaking over a radio. This helps reduce confusion and alerts people that someone is attempting to tell them something. For example, a squad leader saying “Alpha, this is Bravo, be advised, you have enemy infantry on your west flank” is utilizing the alert/identify concept. When things are hectic, it's often a good idea to state your callsign and who you are trying to reach, then allow them to answer you when they're able - for instance: “Alpha, this is Bravo.”, then waiting until they say “Bravo, this is Alpha - send it” or “Bravo - send it” before continuing with your full message.
Generally, standard SESO communication follows this format:
Bravo 6 (Message): 1, THIS IS 6, move to objective Alpha
Bravo 1 (Confirmation and Read-back): 6, THIS IS 1, we are moving to Alpha
When someone sends you a message, even if it isn't a question or a request, you ought to say something so the messenger knows it has been received. If they are giving you an order, confirm their order by read-back, i.e. repeating it back to them. In the above example, Bravo 1 confirms they heard Bravo 6 by responding to them. They also repeat the order back to Bravo 6 to make sure the order is correctly understood.
Prowords
Prowords are a type of jargon that say more with the least amount of words. Rather than spending time explaining your intent in a long form, prowords shorten the amount of time spend talking. Below are a list of common prowords for all sorts of environments. You are not expected to know and use every proword immediately. They should be used whenever there is an opportunity to deliver information succinctly and without follow-up questions.
Radio
| Proword | Long Form Definition |
|---|---|
| THIS IS | This transmission is from the designated call-sign that follows |
| OUT | End of conversation, no response required |
| STAND BY or WAIT | I must pause my transmission, give me a moment before I fully respond |
| BREAK | I have more to say that will be broken up into multiple transmissions |
| BREAK BREAK BREAK or CLEAR COMMS | Everyone stop transmitting, I have something important to send |
| ROGER | I received your message |
| ACKNOWLEDGE or COPY or COPIES | I understand your message |
| WILCO | I will comply with your message or intent |
| AFFIRMATIVE or AFFIRM | Yes |
| NEGATIVE | No |
| REQUEST READ BACK | Tell me what you heard from my last transmission |
| READ BACK AS FOLLOWS or I READ BACK | This is what I heard from your last transmission |
| READ BACK CORRECT | You heard my last tranmission correctly |
| INTERROGATIVE | My following message is a question |
| SAY AGAIN | I did not hear you, repeat your last transmission |
| I SAY AGAIN or BE ADVISED | I emphasize |
| WRONG or CORRECTION | My last message was incorrect, here is the correct message |
| DISREGARD LAST or SCRATCH LAST | My last message was irrelevant, ignore it |
| REPEAT | I am repeating the GRIDREF again (used for artillery calls) |
| RADIO CHECK | Can you hear me on the radio? |
| LOUD AND CLEAR or LIMA CHARLIE | I fully hear and understand you (used for radio check) |
| NOTHING or NOTHING HEARD | I did not hear you (used for radio check) |
| SEND IT or GO AHEAD | I am present and I am ready to listen to your message |
| HOT MIC | You are talking over someone else |
Team Management
| Proword | Long Form Definition |
|---|---|
| ON ME | Follow me (usually in wedge formation) |
| MOVE OUT or STEP OFF | We are starting to move away |
| HOLD | Stay in your current position. We will be here for a few seconds. |
| GO FIRM | Find some cover, get supplies, and hold a defensive posture. We will be here for a while |
| SOUND OFF | Say something on the radio if you are UP |
Personal Status
| Proword | Long Form Definition |
|---|---|
| UP | I am ready, I have reloaded, or I have finished being medically treated |
| SET | I am staying in place and providing overwatch for you |
Fire Control
| Proword | Long Form Definition |
|---|---|
| WEAPONS HOLD | Engage only if you or your team members are engaged. If you can, break from engaging as much as possible. (usually used for stealth) |
| WEAPONS TIGHT | Engage only if you or your team members are engaged. If you see contacts, call them out and get clearance from EL before firing the first shots. |
| WEAPONS FREE | Engage any hostile contacts. (most common status) |
| HOLD FIRE or CEASE FIRE | Stop firing your weapon as soon as possible. |
Warnings
| Proword | Long Form Definition |
|---|---|
| FRAG OUT | I am throwing a fragmentation grenade |
| SMOKE OUT | I am throwing a smoke grenade |
| GRENADE | There is an enemy grenade nearby, run away! |
| BAD NADE or BAD FRAG | There is a friendly grenade nearby, run away! |
| IDF or INCOMING or INDIRECT | Indirect fire support is landing on us, run away! |
Vehicles
| Proword | Long Form Definition |
|---|---|
| CATASTROPHIC KILL | The vehicle is fully destroyed and irreparable. |
| KO or KNOCKED OUT | The vehicle is not operational but reparable. |
| MOBILITY KILL | The vehicle's mobility is destroyed and it is immobile |
| FIREPOWER KILL | The vehicle's weapon is destroyed and it unable to fire |
| TRACKED | Our vehicle's track is destroyed and it is immobile |
| FLAT TIRE | Our vehicle's wheel is destroyed and it is immobile |
| ALL IN? | Is everyone we need inside the vehicle? |
| MOUNT UP | Get in your vehicle |
| DISMOUNT | Get out of the vehicle |
| BAIL BAIL BAIL | The vehicle is about to be catastrophic, get out of the vehicle. |
| GO GO GO! or LET'S GO! | We are inside the vehicle, drive/fly us away. |
Standard Signal Plan
In most cases, an operation's signal plan follows this standard.
| Element Type | Example Name | LRR | SRR | LRR Channel | SRR Channel |
|---|---|---|---|---|---|
| Command | Bravo 6 | AN/PRC-152 | AN/PRC-343 | 1 | 6 |
| Infantry | Bravo 1 | AN/PRC-152 | AN/PRC-343 | 1 | 1 |
| Infantry | Bravo 2 | AN/PRC-152 | AN/PRC-343 | 1 | 2 |
| Cavalry | Carbon | AN/PRC-152 | AN/PRC-343 | 1 | 3 |
| Scout | Sleepy Raccoon | AN/PRC-152 | AN/PRC-343 | 1 | 4 |
| Smoke/Flare Color | Meaning |
|---|---|
| White | Concealment |
| Yellow | Knocked out vehicle |
| Green | Friendly position / LZ |
| Red | Enemy position / TRP |
| Purple | Mass casualties received |
Situation Report (SITREP)
This report is shorthand for
- How are you getting on with your assigned task?
- What is your status?
SITREPs are the most “relaxed” of all reports. It doesn't follow a detailed structure like other reports. It should be quick and conscise. SITREPs inform the higher leader on the status of subordinate elements. If the higher leader wants more details, they will request additional reports.
Below is an example of a good SITREP:
Bravo 6: 1, THIS IS 6, SITREP
Bravo 1: 6, THIS IS 1, We are assaulting OBJ ALPHA. We are receiving heavy fire from armor, need help
Bravo 6: 1, 6 COPIES, OUT
In the above example, the subordinate element quickly mentions their current task and their status accomplishing it.
Below is an example of a bad SITREP:
Bravo 6: 1, THIS IS 6, SITREP
Bravo 1: 6, THIS IS 1, we are fine
The higher leader does not know whether the subordinate leader is progressing towards their task, or whether their element is even ready to perform the task.
Ammo, Casualties, and Equipment (ACE)
ACEREP and ACE Checks are the most common reports an operative can receive. For elements, ACEREP represents the compilation of every operative's ACE Check. For an operative, ACE Check is a question on their ammo, health condition, and specialized equipment. ACEREPs are only between element leaders. ACE checks are between individual operatives.
ACE stands for Ammo, Casualties, and Equipment.
- Ammo: Do you need any ammunition for your primary and secondary weapons?
- Casualties: Do you need medical treatment?
- Equipment: Do you need specialized equipment for your role such as blood bags or AT rounds?
Answering these questions as briefly as possible will inform the leader on the status of their team. If you have a need, let them know through this ACE check.
ACE Check
An operative should answer whether they need ammunition for their primary firearm, whether they need medical treatment, and whether they need specialized equipment for their role like blood bags or AT rounds.
Example of a good ACE Check goes:
Bravo 1 (Alice): Bob, give me an ACE check
Bob: I need x4 5.56 mags, a stitch, and extra AT rounds
If time is limited, an operative can forgo exact numbers and describe them.
Bravo 1 (Alice): Bob, what's your ACE?
Bob: I am low on 5.56 mags, good on medical, low on bandages, and low on AT rounds
If all ACE are green, it is better to summarize in a few words.
Bravo 1 (Alice): Bob, ACE check
Bob: All good
OR
Bob: All green
Below are bad ACE Checks.
Bravo 1 (Alice): Bob, ACE check
Bob: Ammo: Good, Medical: All good, Equipment: Don't have any
An operative should summarize their ACE as “All good” if there are no needs to report.
Bravo 1 (Alice) Bob, give me an ACE check
Bob: Orange on 5.56 ammo, orange on medical, red on HEAT rounds
An operative should not use colors for their ACE Check. That is often used for ACEREP. Colors are more ambiguous that giving exact numbers or describing needs. It is best to avoid colors so the requester does not ask additional questions.
ACEREP
When a higher leader wants to know the ACE of a subordinate element, they will request an ACEREP. Like ACE Checks, ACEREPs follow the order of Ammo, Casualties, and Equipment. When an element has a need for any of the three, they will report it as as a color. Refer to the table on the ACE colors:
| Color | Definition |
|---|---|
| Green | We do not need it |
| Yellow | We need it but we have >=50% in our supply |
| Red | We need it but we have <50% in our supply |
| Black | We need it because we have depleted our supply |
It is common to pause dialogue in order to gather ACE. Before an ACEREP is provided, the leader might request ACE checks from their subordinates. If you want time to figure out ACE, state “STAND BY” or “WAIT”
Whiskey: Bravo, THIS IS Whiskey, ACEREP
Bravo: Whiskey, THIS IS Bravo, WAIT OUT
Some time passes…
Bravo: Whiskey, THIS IS Bravo
Whiskey: Bravo, THIS IS Whiskey
Bravo: We are red on 9mm mags, yellow on 5.56 mags, green on medical, red on HEAT
Whiskey: ROGER, OUT
For casualties, you would report the exact number of wounded or “downed” operatives.
| Pro Word | Color Equivalent | Definition |
|---|---|---|
| Up | Green | Operative does not need medical treatment |
| Wounded | Orange | Operative is conscious but needs medical treatment |
| Down | Red | Operative is unconscious and needs medical treatment |
| Dead | Black | Operative is dead and does not need medical treatment |
Since elements could differ wildly in size, reporting casualties in ACEREP should include any operatives that are up. A 2-man scout team reporting 1 operative down is more urgent than a 6-man infantry team reporting 1 operative is down. For ammo and equipment, follow procedure to omit them from the report if they are green.
Bravo: Green on ammo. We are 4 up, 1 wounded, 1 down, 1 dead. Red on blood, OUT
Grid Reference (GRIDREF)
Also known as Grid Reference, is essential for reporting your position. It is also used to report positions of enemy targets for IDF. Understanding and using GRIDREF means you can provide any operative an accurate position of any target. This is also useful when you are lost and surrounded by generic landmarks such as forests or deserts.
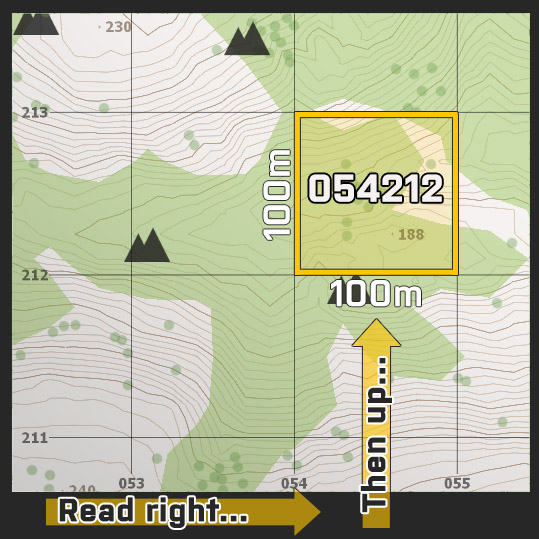
To respond to a GRIDREF request, open your map and find your target within a square. Read right then read up. Go down the corridor than up the stairs. In mathematical terms, read laterally or X-axis then vertically or Y-axis.
The size of each square in a GRID represents is in multiples of 10. The smallest square is 100m tall and wide and contains 6 digits (123456). Next square is 1000m or 1km tall and wide and contains 4 digits (1234). The largest square is 10,000m or 10km tall and wide and contains 2 digits (12). In almost all GRIDREFs, assume the requester wants a 6 digit reference.
Sometimes, you need to GRIDREF a precise area within a 100m square. Imagine your keypad superimposed over the square. Tack on the appropriate keypad number to the end to make a 7 digit GRIDREF.
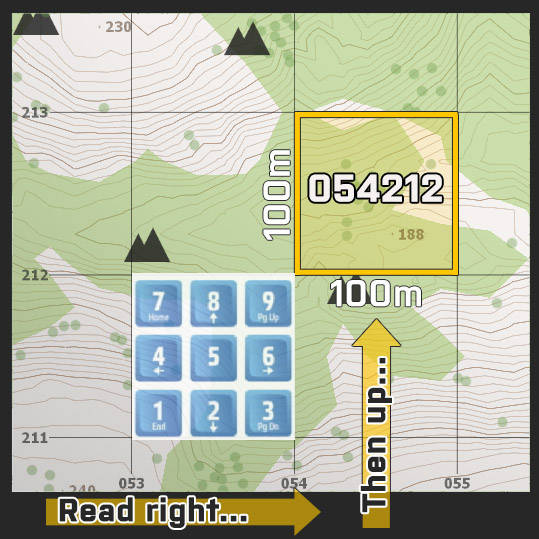
Examples of good GRIDREFs are below. Here is an example with 6 digits.
Bravo 1 (Alice): Bob, what's your GRIDREF?
Bob: Alice, THIS IS Bob, I am at GRIDREF 054212
Alice: Bob, Alice COPIES, OUT
Example with 7 digits:
Alice: Bob, what's your GRIDREF with keypad?
Bob, Alice, THIS IS Bob, I am at GRIDREF 053211 tack 5
Alice: Bob, Alice COPIES, OUT
Contact Report (CONREP)
Also known as Contact Report or Contact! It is the most common report you will give as an operative. It is a critical skill to be able to quickly and accurate deliver a CONREP as it informs your team of possible threats.
There are 3 components to a CONREP: ALERT - ORIENT - DESCRIBE.
ALERT
The alert component is usually the word “Contact!” itself.
- The first thing to say in a CONREP
- Informs operatives that threats may be nearby
ORIENT
When everyone is alerted, they should be oriented towards the location the contact was last seen.
Depending on the time available, you can choose to be as detailed as possible. Below is a list of orientation methods, starting with the most detailed and preferred method.
- Compass Bearing
- Read the 3 digit numbers on your compass and DUI squad radar. They range from 000 to 359. Each digit must be read individually (THREE FIVE NINE)
- If the number has less than 3 digits such as 1 or 10, read the empty spots as leading zero digits (for 1, say ZERO ZERO ONE. For 10, say ZERO ONE ZERO)
- Cardinal Direction
- Use the written directions on your compass and DUI squad radar such as “North”, “East”, “West”, “South-West”
- For more precision, you can use intercardinal directions such as “North North-West” and “West South-West” to orient between the cardinal directions
- Relative Direction
- If you are moving or in a vehicle, use “Front”, “Rear”, “Left”, and “Right” to orient
- If in a vehicle, front always refers to the front of a vehicle
- For stationery positions such as defense where multiple directions could be watched, this method will not be sufficient
Examples of CONREP with orient would be:
- Contact front!
- Contact ZERO ZERO FIVE!
- Contact West!
DESCRIBE
In the smallest amount of words possible, what did you see? where did you see it?
Describing the contact will instruct your team on how to respond. For example, describing an armoured contact will prepare your AV specialist to engage. Describing enemy infantry may focus your team to engage the contact as fast as possible.
Describe the position of the target by using the distance and nearby terrain. Distance can be numeric or descriptive, like “close” or “far.” For example, if the target is in a building 400 meters away, say “infantry in second story window, 400 meters” or “rifleman across the street, sidewalk, close” or “500 meters, contact near the tree line.” The more distinctive details you can describe, the better.
If contact so close that it's obvious, you can omit describing the type of contact.
Examples
Examples of CONREP are below. Notice the colors of each component to differentiate them:
ALERT - ORIENT - DESCRIBE
- “Contact left, very close!”
- “Contact front, infantry, 100 meters!”
- “Contact, 320, enemy squad in the open, 400 meters.”
- “Contact, 175, BTR-K, 600 meters. From the tallest tree at that bearing, follow the bush line left about 30 meters. It's partially masked by those bushes.”
- “Contact, 225, dug-in infantry, 300 meters. There's a white-walled building with a red roof - on the right side of that is a brown building. Enemy infantry are in the upper floor of the brown building, I've seen them in several windows.”
Infantry Skills
Formations
Formations are essential skill for any element. Leaders can easily keep track of their operatives in a formation and orient them towards an objective. They control spacing between operatives, maintain that standard 5-10 meters distance to prevent the enemy easy targets. Be aware that formations end when combat begins. The nature of combat requires operatives to weave between cover, regardless of the formation they follow.
There are 4 formations operatives are expected to know: wedge, line, column, and ARD. While there are other formations in existence, these are most effective within SESO's operations.
Wedge
When not otherwise stated, the default formation for squads is the wedge formation.
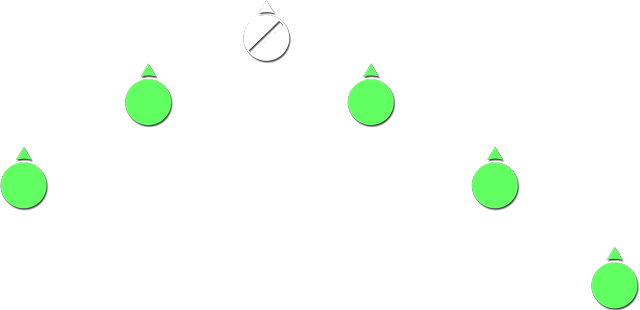
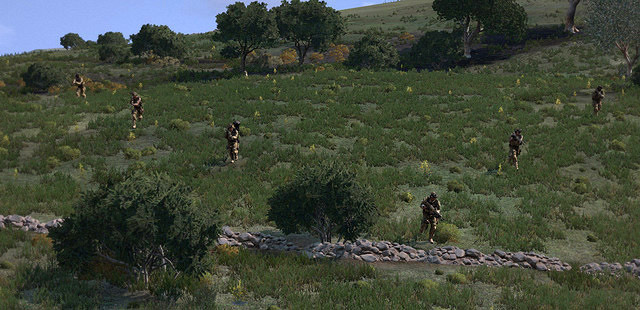
The wedge is the most common and versatile formation. It can easily transition to a line or a column. A wedge sees the most area. It is least vulnerable to flanks. There are few scenarios where a wedge is not the best formation to use.
A wedge is headed by the squad leader in the middle, the fire team on the leader's left and the maneuver team on the leader's right. Every operative should stand diagonally from the leader with 5-10 meters distance between each operative.
A wedge should be used in all situations except when a line or column would be better. See below for best conditions for a line or column.
Line
The line formation is the best formation when engaging a target. Unit in combat already tend to gravitate to lines since the form focuses everyone's sight and fire lines towards the front. When defending or assault an objective, a line prepares all forces to engage the target on an equal footing.
Like the wedge, the squad leader's fire team should be on the left and the maneuver team on the right with a distance of 5-10 meters. A perfect formation is not necessary and it is normal to see “bowing” in the line.
A line should be used in two conditions:
- Clearing an area
- A line has the most vision towards the front, making it ideal for search and destroy type missions where a large area has to be cleared
- Defending or assault an objective
- If you are expecting combat to happen soon, it is best to orient towards the opponents in a line.
It should be avoided when:
- Traveling for a large distance
- A line is harder to follow than a wedge or a column. If you are traveling for a large distance, lines will tend to lag behind when everyone tries to adjust themselves to the formation. It is best to use a wedge or column for this situation.
- Flanking is likely
- If a flank or ambush is likely, do not use a line. If enemy forces flanks your side in a line, their bullets may penetrate the formation and hit multiple operatives.
(Staggered) Column
A staggered column formation, or column for short, is best used for traveling long distances. Since most sight lines are on the sides of the form, attacks from the sides are less effective. It is often used on roads where cover is not immediately available and an enemy ambush could occur.
A column is weakest at the front since bullets would penetrate the form and fly between operatives. Avoid using column form when engaging enemies head-on.
Technically a standard column is not staggered. However, a non-staggered column, also known as a single-file line, is so niche that it is not worth covering in this handbook. A staggered column is always preferable and we refer to as a column.
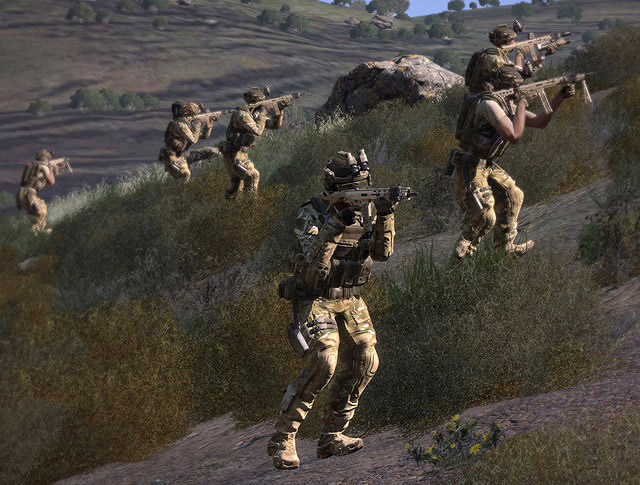
A staggered column is defined by two vertical columns. The first column starts on the right and slightly forward, led by the squad leader then the fire team. Across the gaps of the line, the maneuver team would form the second column. Every operative would stand at least 5-10 meters away from the unit in front of them and across from them.
A column should be used when:
- Traveling for long distances, especially on roads
- In the event of an unexpected ambush, the column could quickly disperse and engage.
A column should be avoided when:
- Combat is expected to begin
- In the event that combat begins, the column will be flanked from its front. It has the least vision towards the front since friendly forces stand in the way of each others' sight lines.
All Round Defense
Also known as perimeter defense, it is the most common defensive tactic. Often called by EL as “360° Security,” “Watch the Perimeter” or “ARD” it is essential for protecting your operatives. It is the only formation that is stationary, you do not advance in this formation.
When dismounting into a new area, such as in an LZ, EL will call for ARD. Using your DUI radar, pick a cardinal direction that no one is watching and watch it yourself. See if there is any cover to hold that is within 50 meters of your dismount point. After committing to a direction, check if there is any overlap with another operative and move elsewhere to fill gaps. It is more important to quickly pick a direction to watch than to wait until gaps appear. Don't be afraid to run towards any direction and correct yourself later. Security should last a few seconds to a couple of minutes until the squad moves again.
An ideal ARD watches all 360° of direction. You should generally be no more than 50 meters from the center of the form and 5-10 meters from each operative. It is also common for a 6-man squad to have overlap in sight lines. If there are no gaps in the ARD then overlaps are permitted.
When performing security, you should watch your side and call out CONREP. You should not leave your post during security. Any gap in the circle will threaten the virtual lives of all operatives. It is far better to have nothing happen during security than to be killed from your flanks due to a gap in the circle.
Keep in mind this is different from “going firm.” When an EL announces “Go Firm!” they allow you to move to defensive positions in any form, up to 100 meters from the center of the squad, to any cover. You are not expected to follow this formation. Security may last a few seconds to a minute while “going firm” can be much longer.
Types of Fire
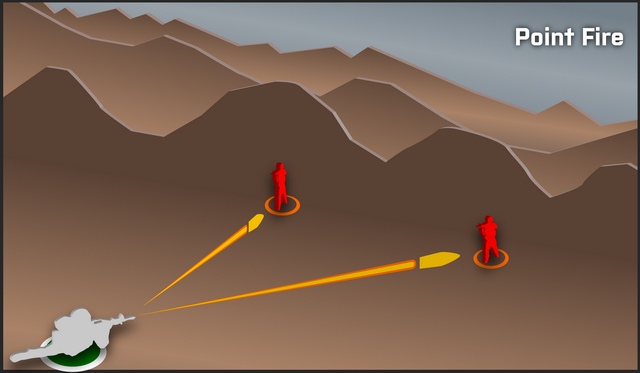
When firing on a target, one's intent dictates how you may fire. While there are many different types of fire, the two utilized in SESO are point fire and suppressive fire.
Point Fire
Point fire is to fire on a target with the intent to land as many shots onto the target. This fire can be precise but slow. You are trying to hit a specific point with as few shots as possible. You may see the enemy clearly and engage them. You may also wait until the enemy is exposed to fire at them. Point fire is the most intuitive type of fire one can perform, just aim and shoot.
Suppressive Fire
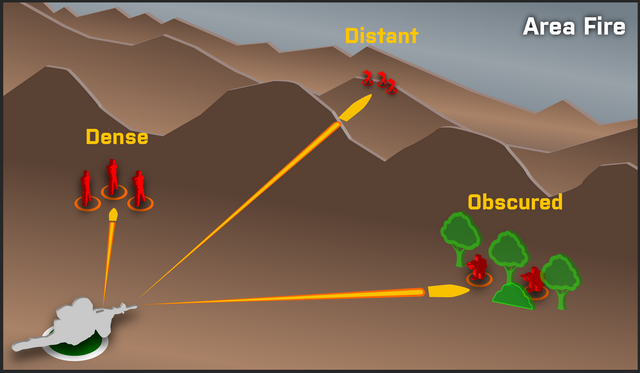
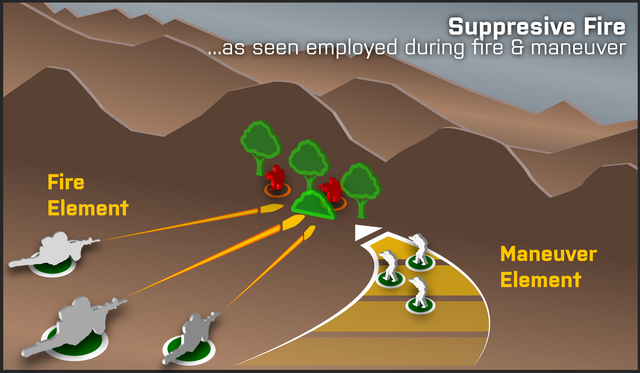
Also known as area fire, suppressive fire is to fire on a target with the intent to “fix” them. Fixing a unit means to reduce their ability to return fire or maneuver. This time you are not trying to hit precise shots at a deliberate pace. You are trying to unload a large volley of bullets towards the target as fast as possible, regardless if those bullets are hitting them.
Suppressive fire is also ideal when the opponent is covered or concealed. It is better to return fire towards the general direction of the opponent in hopes of landing a shot than to wait for the perfect point fire. The rule of thumb is to use point fire when you can clearly see the target, otherwise use suppressive fire when you cannot.
Suppressive fire can also be called your EL when performing fire and maneuver.
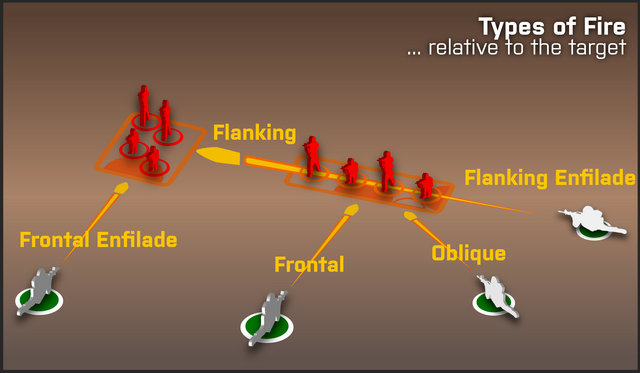
Fire Relative to Targets
This diagram should say it all. Just to be safe, though, we'll cover it in more detail:
- Enfilade fire is fire that coincides with the longest axis of the target.
- Defilade fire is fire that coincides with the shortest axis of the target.
- Flanking fire is hitting a target in the side.
- Oblique fire is hitting a target from an angle.
- Frontal fire is hitting a target from the front.
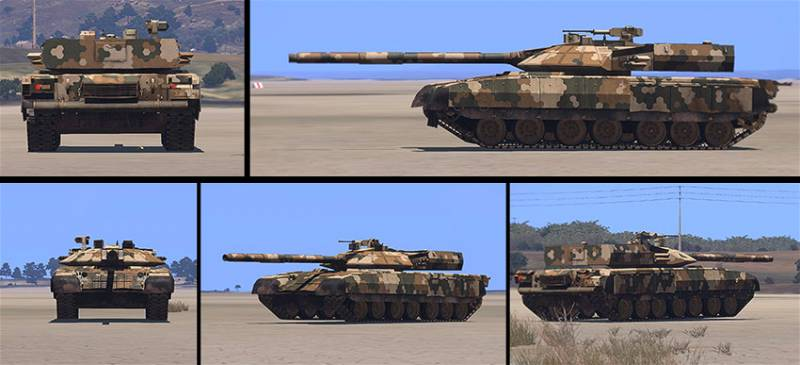
Vehicle Directions
In order, the best directions to hit most vehicles are the rear and the flank. See the top row in the image.
The worst directions to hit a vehicle are the front, frontal oblique, and rear oblique. See the bottom row in the image.
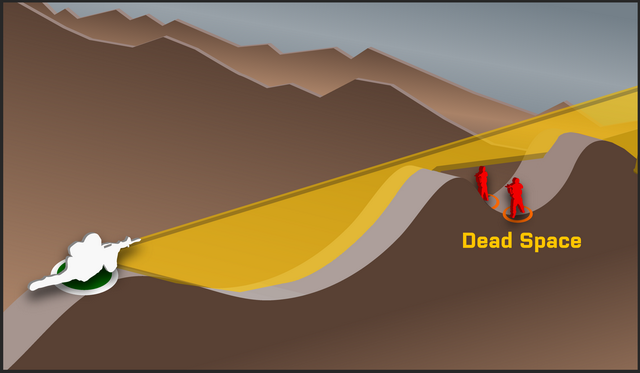
Enfilade, Defilade, and Dead Space
Enfilade is any position where attackers are at an advantage. Sometimes this is a position without cover or concealment. Sometimes, it is a flank on the most dense side of defending force.
Defilade is the inverse; it is any position where attackers are at a disadvantage. This is where cover and concealment is plentiful. It could also be the front where defenders may expect you.
Dead space is any area where the attacker is unable to engage you. It can be geographical locations such as depressions in the earth or rooms in a building. It can also be out of view from fixed guns such as the dead space directly above a tank. All dead space is a defilade but not all defilade is dead space.
When engaging enemy forces, keep yourself in the defilade as much as possible. Find positions where the enemy will be in the enfilade. Always keep dead space near you in case you need safe space to breathe.
Fire and Maneuver
The most common offensive tactic for infantry is Fire and Maneuver. The purpose of fire and maneuver is to eliminate a target by fixing them in one position, then approaching them for CQC; ergo, fire at them and maneuver towards them.
The element with the most MG, CSW, or armed vehicles setup the BOF. This is a position where the team engages the target from afar. The rest of the squad approaches the target and attempts to engage them within a 100m range.
Within a squad, there are always pre-designated fire teams and maneuver teams. A typical fire team will include the MG to provide suppressive fire and a L to fortify, supply ammo, or build CSW. The rest of the squad make up the maneuver team which will approach the target, usually leapfrogging. A typical maneuver team will include a G, AV, and R. The SL may act independently as a communicator between the two teams.
Fighting In Someone's House (FISH)
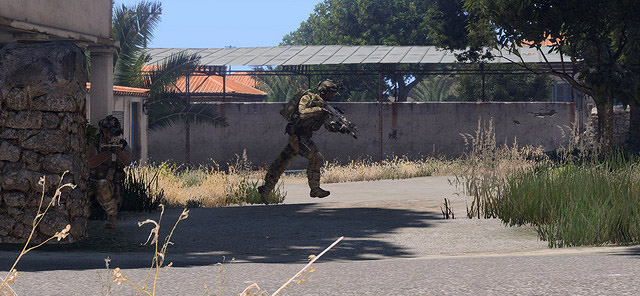
Combat in urban terrain, also known as FISH or MOUT, is an entirely different experience. Vehicles transform from force multipliers to liabilities, infantry lose sight of each other between buildings, and threats could emerge from all three dimensions.
Many tactics change in FISH environments and FISH environments differ by nation, city, and even street. Follow these guidelines when FISHing.
- Wide formations are less effective as the confining streets of a city limit your space. Outside of column and ARD, there are no formations you could depend on.
- Watch for potential danger areas such as doors, windows, balconies, and roofs. Any of them could be potential hiding spots for enemies.
- Move slowly and deliberately. In an urban environment, combatants could be much closer than you than expected.
- Avoid sticking out in the open. If you are attacked in the open, you may be without any cover and concealment against a force hidden in any of the numerous buildings. Stay close to cover such as walls and dead space.
- Avoid hugging walls. Any rockets and grenades that miss your position may land on a wall nearby instead, throwing shrapnel your way.
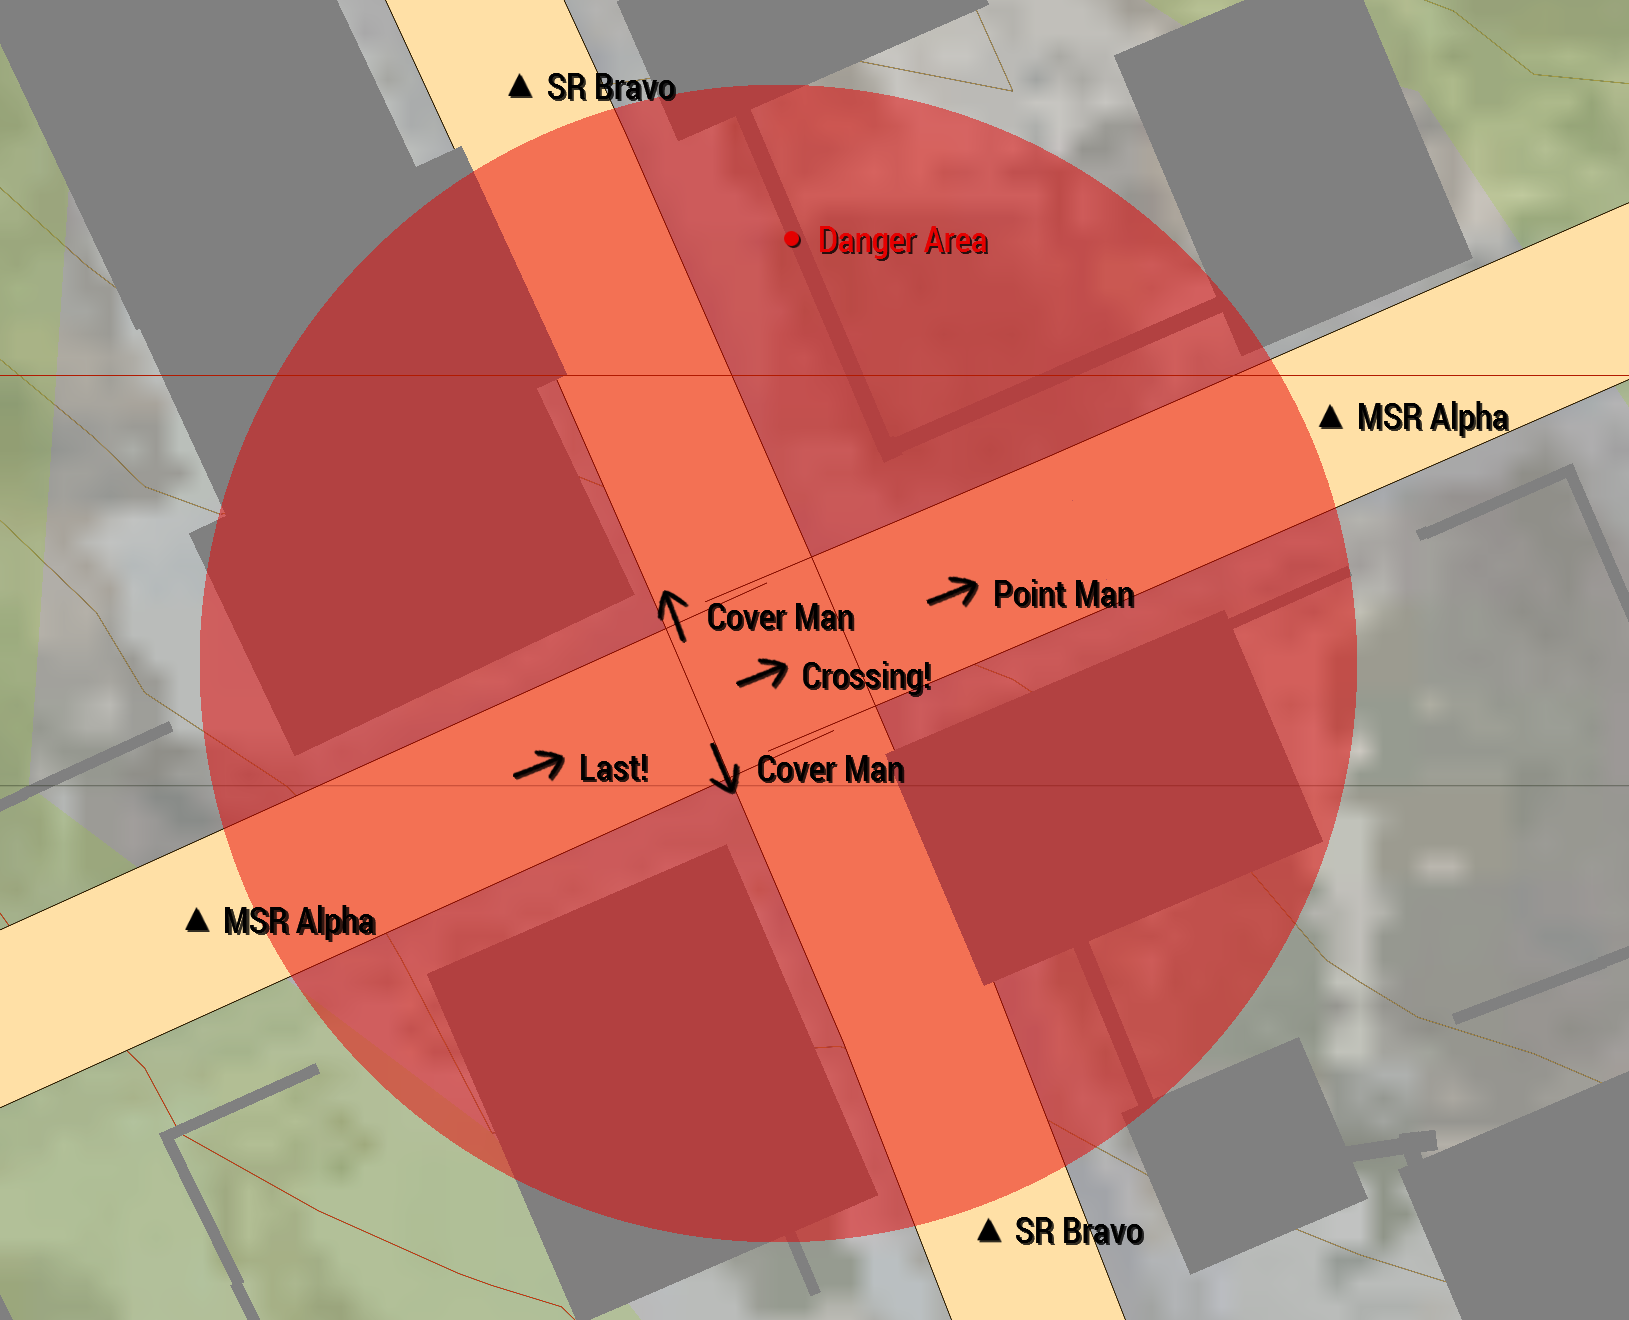
Danger Area
Danger areas are locations at which there's a heightened level of vulnerability for anyone caught within them, and must be treated with due caution. They can be bridges, streams, large open lanes in forested terrain, or even streets in an urban environment. Danger areas are frequently observed by the enemy, and can have snipers, machinegunners, or enemy rifle fireteams ready to deliver fire into them on short notice.
The technique for crossing a danger area is another form of leapfrogging. The idea is to maintain security and cross in small numbers that will not draw undue attention or fire.
Crossing Urban Danger Areas
Urban danger areas are usually 3 dimensional roads such as 3 way and 4 way intersections. Every team member needs to be familiar with what to do when dealing with danger areas in the urban environment. Due to the chaotic and fast-paced nature of urban combat, there are no strict roles for each team member to take when crossing urban danger areas. Instead, roles are based upon where in the formation a given person is, regardless of their team role.
When moving up to a street danger area, follow the crossing drill:
- The first person in the formation (point man) will stop at the corner, scan both directions, take a knee, and then say “Set!” becoming the cover man
- The second person in the formation will then move up. When they are ready, they will say “Crossing!” and then run across the danger area
- The remaining members of the element will follow across various intervals, based upon whether enemy fire was received and other considerations
- The last to cross will say “Last!” to let the cover man know that it will be their turn to move next
- The last person to cross will be the new point man
When crossing a danger area with little cover or concealment, throw smoke grenades ahead before crossing.
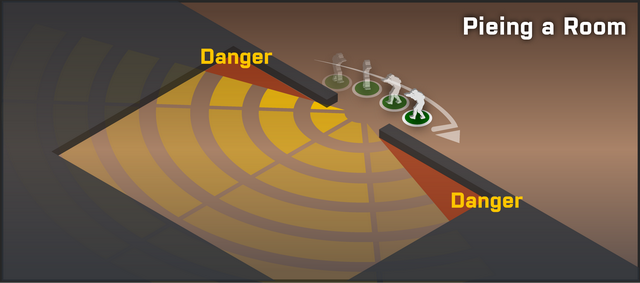
Pieing
Every room is a potential danger area until it is clear. There are various ways these areas.
Begin by pieing or slicing a room. This is the process of slowly and deliberately moving from one end of the doorway to another in such a way that you can see most of the room. Every new area you see is a “slice” of the room. This clears most of the room of potential danger areas, leaving only the deep corners on the dies of the doorway.
- Do not stand in the middle of a doorway, move slowly from one end to another
- Take it slow, moving quickly catches fire
- Do not enter a room until it is fully pied
Once a room is pied, you may enter it to clear the possible danger areas, such as out of view corners.
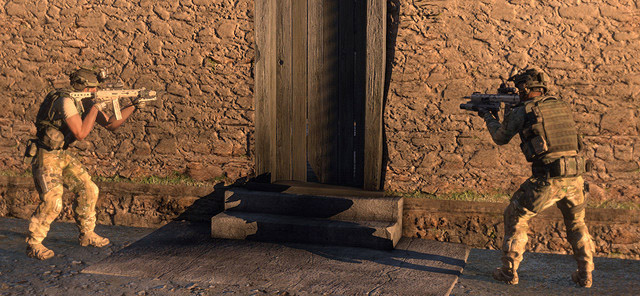
Stacking
Before entering a building, find an entry way and stack it. Choose between a full stack or split stack.
- Split Stack: Say “stack left” or “stack left” when it is in a corner where only one side is accessible.
- Full Stack: Say “stack on the door” when it is in a wall where both sides are accessible and the door is closed.
To stack a doorway, line up a team against the building. In a full stack, all operatives stack one wall next to the doorway. In a split stack, operatives split their forces on both sides of the doorway. The last person in the stack always watches the rear of the line.
Once a stack is established, the first operative in the line, the point man, calls “clearing right!” or “clearing left!” and opens the door. The second operative declares the opposite direction and moves that way. Each operative alternates in opposite directions upon entry to the building until the stack has fully entered.
Clearing
After stacking an entrance, each operative will follow a wall closest to them. On every new doorway, repeating pieing and stacking methods.
Avoiding entering a room alone. Communicate often and yell “clear!” whenever a room is cleared of potential enemies.
In some interiors, such as hallways, you may have multiple doors that enemies could emerge from. Clear one room at a time and always dedicated a cover man to watch the hallway and other potential danger areas. The cover man should stay close to the clearing team and hold no further than the last cleared room.
Once a building is fully cleared, use black spray paint to automatically mark it on the map.
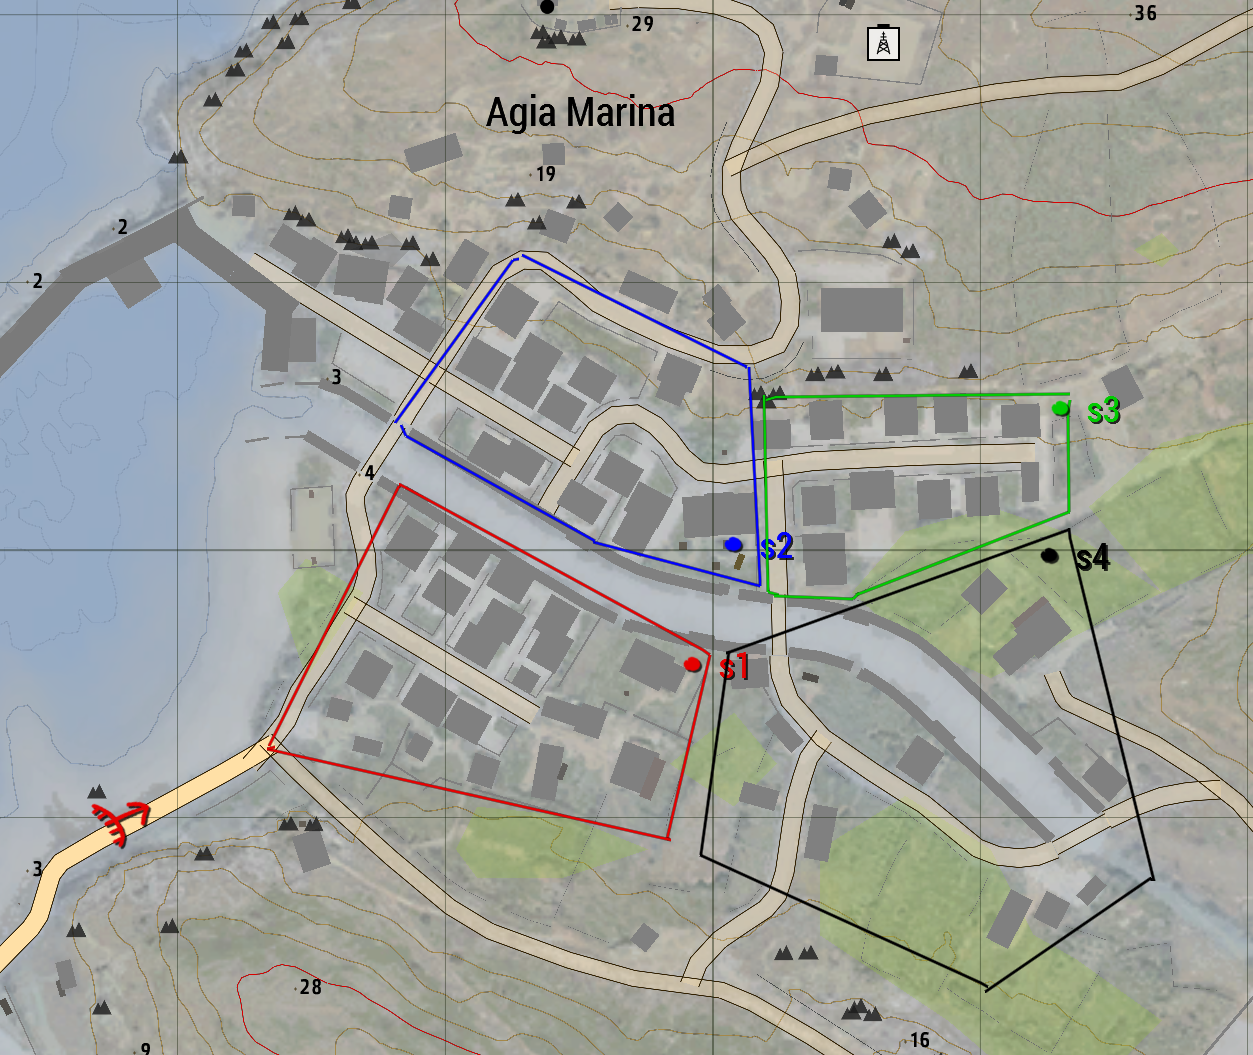
Sectorization
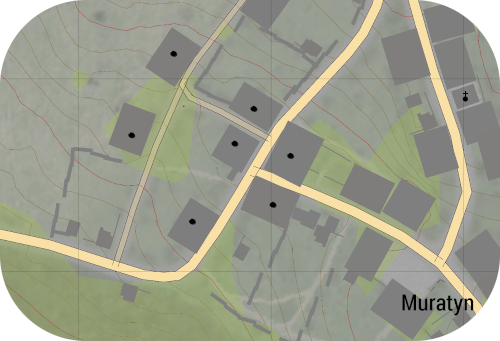
Sectorization is the process of dividing the urban terrain into multiple sectors. A sector is designated with a polygonal shape, numbered, and optionally colored according to the team assigned. Each sector is an arbitrary grouping of buildings that are geographically close to each other.
Friendly units reference sectors . Rather than sending all forces towards an urban environment, sectors prevent friendly fire and organize FISHing jurisdictions. Any elements from 2-man buddy teams to full 6-man squads can clear a sector, depending on the amount of buildings in the sector.
The EL will mark sectors, color coded with their element and named with numbers like s1, s2, s3, etc.
Moving Between Sectors
In most cases, your higher leader will inform you which sector belongs to your element. As the firefight develoes, you may enter a different sector to assist nearby operatives.
Any operative who leaves their designated sector and moves to a different sector should report it to their EL. The EL will report to all stations so all elements are aware. Report your callsign, sector you are entering, and the compass direction you are entering from.
Bravo 1 R: Bravo 1 Actual, THIS IS Blue Team, I am moving into Sector 4 from the North
Bravo 1: Copy that, Blue Team, I will inform all stations.
Failure to report your movements to other sectors could result in friendly fire. Always let all stations know when you are moving away from your designated sector.
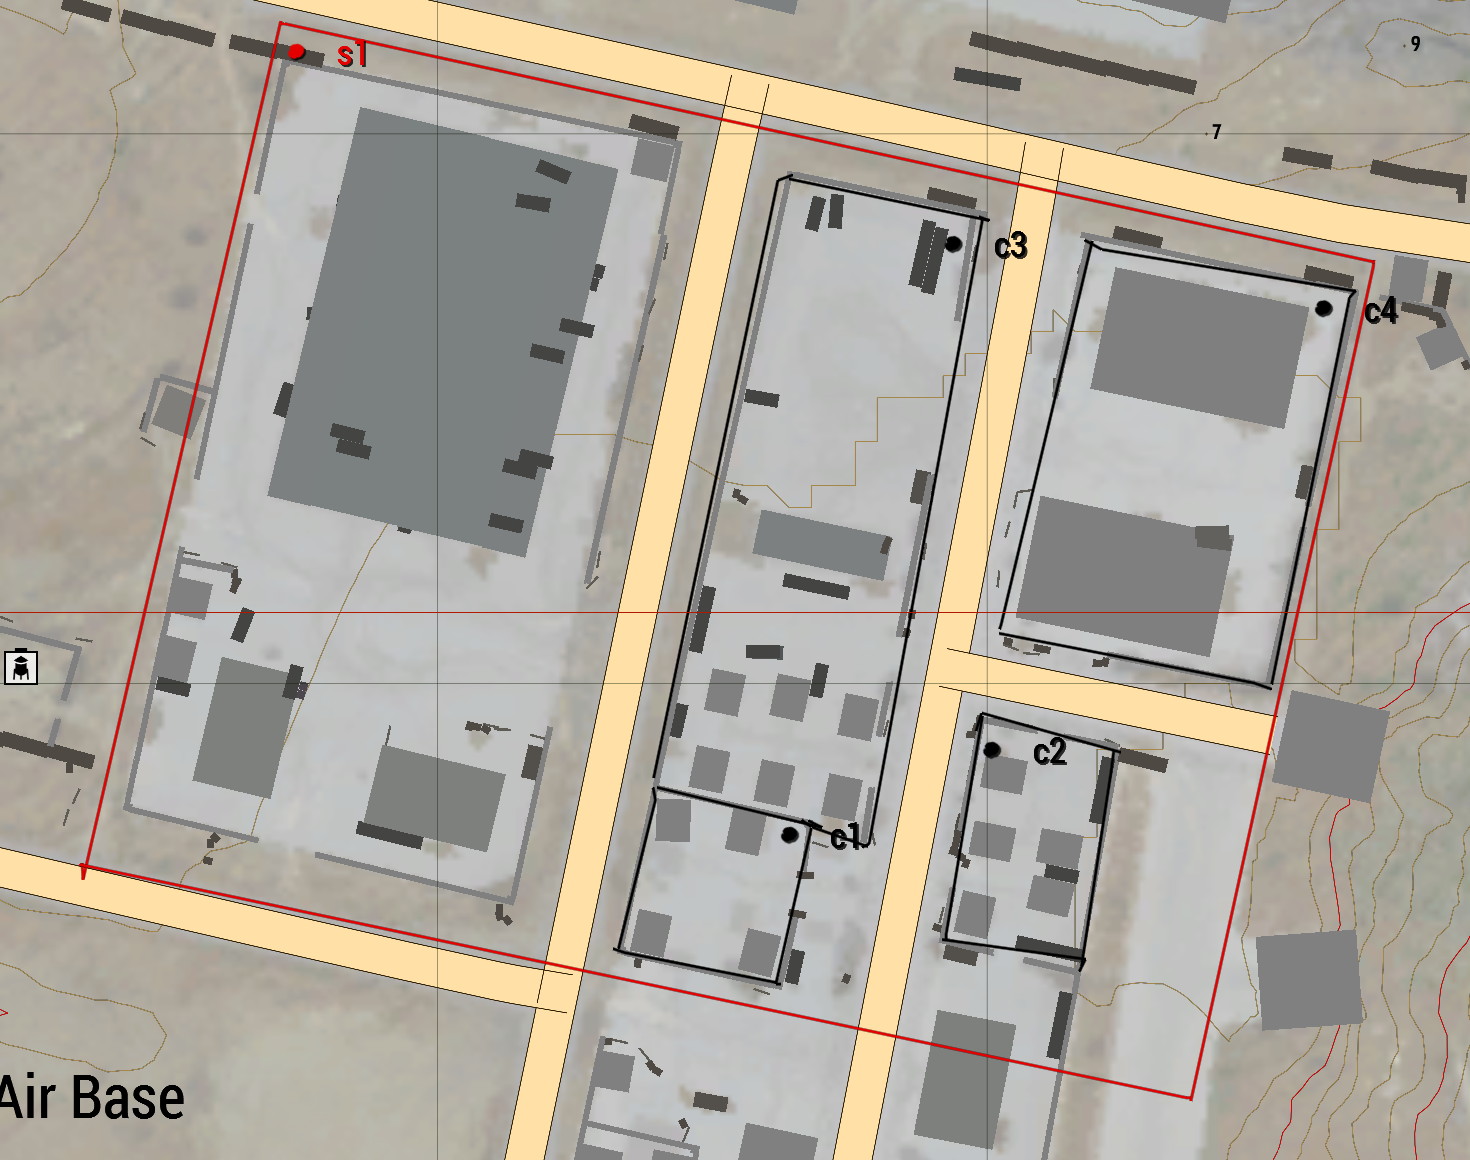
Compound
Some buildings are surrounded by walls or fences that block movement into the area. These are known as compounds. These compounds are deadly to enter as there are only a few entrances possible.
As part of the sectorization, compounds can be marked within or without a sector. They are usually colored black and designated as c1, c2, c3, etc.
Follow FISH procedure when clearing these compounds as if it is one large building.
Cavalry Skills
Purpose and Mission
Cavalry vehicles are not three-man armies! Crewmen in ground vehicles are cogs in a much larger machine. Your primary goal is to SUPPORT THE INFANTRY. Without you, the infantry is vulnerable and susceptible to attack, and likewise, without you, the infantry is far less effective as a team.
Reconnaissance and Target Acquisition
When the situation is safe to do so, the commander of a vehicle is free to dismount and perform foot reconnaissance. They are also able to function as a ground guide.
A ground guide functions as follows: The commander or an infantry member guides the vehicle through a difficult-to-navigate area, and damage to the vehicle is likely to occur.
It is also the commander's job to identify targets from within the vehicle.
Using Your Vehicle as More Than a Weapon
Vehicles are highly versatile tools. As a vehicle crew it is important to understand that you may do more than shoot targets and provide overwatch for infantry.
For example, if a path is blocked, make one! Vehicles like trucks and light armored vehicles can easily drive through fences, trees, and light walls. Tanks and heavier armored vehicles can plow through even more. Additionally, knocking down trees and camouflaging your vehicle behind it provides effective improvised cover. Use your vehicle to its fullest extent!
Vehicles can also transport infantry and supplies. Use the space in your vehicle to store additional ammunition, medical supplies, building materials, and spare parts—your team will thank you later.
Heads-Up Display (HUD)
In a ground vehicle in Arma 3, you will notice the HUD of a vehicle. This includes a vehicle radar. This vehicle radar appears as a compass line stretching across the top of your screen in the CUP mods (Community Upgrade Pack) and as a circle in IFA3 (similar to the vanilla vehicle radar). Additionally, there may also be an indicator displaying the orientation of the guns on the vehicle. This is typically only available on vehicles with cannons.
Along with these indicators on your HUD, there is also the vehicle damage indicator:
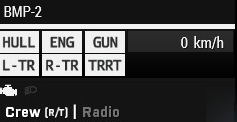
This displays how much damage your vehicle has sustained.
- HULL indicates damage to a vehicle's hull. When damaged to the point of being red, the vehicle will explode and likely kill or incapacitate the crew.
- ENG indicates damage to a vehicle's engine. When damaged to the point of being red, the vehicle's engine is inoperable and the vehicle cannot move to generate power.
- GUN indicates damage to a vehicle's gun. When damaged to the point of being red, the vehicle's gun will no longer be able to elevate or depress. The gun can still fire.
- L-TR indicates damage to a vehicle's left track. When damaged to the point of being red, the track will need to be replaced. A broken track immobilizes a vehicle.
- R-TR indicates damage to a vehicle's right track. When damaged to the point of being red, the track will need to be replaced. A broken track immobilizes a vehicle.
- TRRT indicates damage to a vehicle's turret. When damaged to the point of being red, the turret will no longer rotate and the gun will no longer be stabilized (if applicable).
The weapon and ammunition indicator is in the top right of your screen. It looks like so:

It displays the currently active weapon/countermeasure. The large number is the amount of ammunition. Use the numbers at the top of your keyboard to switch between weapons/ammo type and countermeasures.
Countermeasures
Ground vehicles often come equipped with countermeasures. These countermeasures are usually operated by the vehicle commander. By default, press “C” on your keyboard to operate the countermeasures. One of the most common and effective countermeasures in the game are smoke grenades.
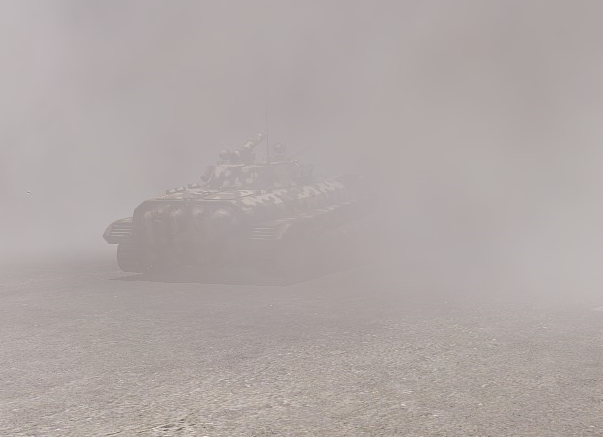
Smoke grenades provide quick cover to provide concealment for retreat or advancement.
Vehicle Armament Types
Ground vehicles come equipped with a large variety of different armaments and ammunition types used for different purposes.
Large-calibre Cannons
Large-calibre cannons are the primary weapons of most tanks. They usually inflict a lot of damage with a relatively slow rate of fire (about 6 seconds for one shot for most tanks). The tradeoff for the slow reload rate is the massive capability of destructive power.
Cannons can come equipped with different types of ammunition:
- APFSDS/APDS: Armor-piercing fin-stabilized discarding sabot/ Armor-piercing discarding sabot. These are the primary types of ammunition for engaging other tanks. They are less effective against lighter vehicles and infantry because of a lack of explosive mass.
- HEAT: High-explosive anti-tank. HEAT shells are to be used against lighter targets including APCs, IFVs, and trucks. They contain explosive mass.
- HE: High-explosive. HE shells are best against buildings and infantry. They contain a large amount of explosive filler.
- APERS: Anti-personnel. APERS are less common and are essentially huge shotgun shells.
Small-calibre and Automatic Cannons
Autocannons are usually found on lighter vehicles such as IFVs. They have fast-firing cannons that are of a significantly smaller calibre than tanks.
Autocannons can come equipped with different types of ammunition:
- APFSDS/APDS: Like their larger counterparts, autocannons have armor-piercing fin-stabilized discarding sabot/ Armor-piercing discarding sabot. These are the primary types of ammunition for engaging armored vehicles.
- HE: High-explosive. Small-calibre HE shells are best against infantry. They contain a large amount of explosive filler.
Machine guns
Vehicles also often come equipped with at least one machine gun. The most common type of machine gun is a coaxially mounted machine gun (Coax). A coax is operated by the gunner and is usually mounted right next to the cannon. It is best used against infantry. Other types of machine guns include an externally mounted machine gun operated by the commander or loader. There are also remotely-operated machine guns which are operated by the commander from within the vehicle. They are mounted on the roof of most vehicles that carry them.
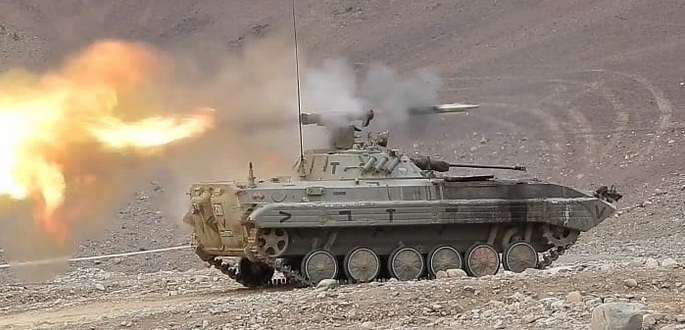
Anti-tank Guided Missiles (ATGMs)
ATGMs are missiles operated by the gunner. They are usually only on IFVs. They give IFVs a better chance of fighting against tanks. When enemy armor is not present, ATGMs can be used to destroy buildings and other structures.
Roles Within a Vehicle
Having a SESO cavalry certification means you can operate all the roles within a ground vehicle, including but not limited to driver, gunner, and commander.
Driver
The driver of a vehicle is pretty self-explanatory. You drive. Along with driving comes many responsibilities:
- Watch for threats on the road or path you are driving (ex. IEDs, mines, other explosives).
- Maintain a safe following distance of 3 vehicle lengths when driving in a convoy. Nobody wants to get ARMA'd!
- Drive the vehicle according to the commander's orders.
- Stays active and aware to prevent unnecessary damage to the vehicle.
Drivers can disobey orders if they feel the mission will be jeopardized. Do not listen to a commander who tells you to drive off a cliff when you're in a fight!
Gunner
The gunner shoots. Surprise surprise! However, a gunner also has many responsibilities:
- Fire the gun according to your commander's orders. They may issue a fire-at-will command or they may need you to require permission to shoot. You'll know, they'll inform you!
- Scan the vicinity using your optics to spot potential enemies.
- Stays active and aware to prevent unnecessary damage to the vehicle.
- Use the correct weapons and ammunition to engage threats (ex. do not fire a machine gun at a tank).
Gunners can also make split-second decisions if they are in danger. If you are on a return fire order and see an enemy aiming an RPG at your vehicle, do not wait for the commander's word! Eliminate the threat.
Commander
The commander is a vehicle's heart and soul. If there is no commander or the commander is incapacitated, the driver will inherit their role and responsibilities. The commander is the senior-most member of the vehicle's crew and communicates with higher echelons of command, such as Team Leaders, Squad Leaders, and the Platoon Leader. Some of the commander's responsibilities include:
- Direct the driver and gunner
- Coordinate with command and the infantry
- Identify and designate targets for the gunner
- Use the machine gun if necessary and applicable
Some orders that a commander may issues are as follows:
- Orient [compass bearing]. This may be issued to either the driver or the gunner to orient the hull or the turret in a specific direction.
- Hull down and turret down.
- Hull down: The driver will move the vehicle into a position where only the turret is exposed.
- Turret down: The driver will move the vehicle to a location where the vehicle is completely behind cover.
- Long/Short: The commander observes the gunner either overshot or undershot the target and the gunner must adjust.
- Fire/Fire-at-will
Types of Vehicles and How to Identify Them
Vehicle identification is useful for determining how to disable and/or destroy an enemy vehicle successfully. There are three levels to identifying a military vehicle. Those are as follows:
- Class
- Subclass
- Specific model name
For vehicles not related to military use, refer to them as their common names like:
- Truck
- Car
- Bike
- Etc.
Light Vehicles
Light vehicles can be identified by spotting:
- Wheels
- Not armed with an autocannon or larger armament
- Not an AFV
Some subclasses of light vehicles include
- Technicals: Civilian vehicles, often pickup trucks, adapted for military use
- MRAP: Mine-resistant ambush-protected vehicles. Resistant to small arms fire and some explosives
- Truck: military truck (such as logis)
Armored Fighting Vehicles (AFV)
AFVs can be identified by spotting:
- Wheels and/or tracks
- Can be armed with nothing or up to a cannon
- At least protected against small arms
AFVs have several subclasses that make it easier to identify and thus fight them
- Armored Personnel Carriers (APC) would be armed with up to a heavy machine gun
- Infantry fighting vehicles (IFV) would be armed with up to an auto cannon and often times also ATGMs.
- Assault guns are self-propelled anti-tank cannons.
- ATGM carriers are self-propelled ATGM placements.
Handheld anti-vehicle munitions and other vehicles in this class are likely to easily destroy all of these vehicles.
Tanks
Tanks are identifiable by the following. They are:
- Tracked
- Turreted
- Capable of withstanding fire from small arms and autocannons
- Having a large-calibre cannon intended for direct fire
Identifying other types of potential targets
You may encounter other types of threats that would need to be identified.
Anti-Air
Anti-air has two classes:
- Anti-air artillery (AAA “Triple A”)
- Surface-to-air missiles (SAM)
These can either be self-propelled or stationary and in the case of SAMs, they can even be carried by infantry.
Types of Helicopters
- Utility Helicopter: armament intended for defending itself (ex. door gunner)
- Attack Helicopter: armament intended for offensive use
Types of Planes
- Cargo plane: Intended for transport of personnel or equipment
- Attack plane: Low and slow-flying aircraft intended to attack ground targets
- Fighter plane: High and fast-flying aircraft intended for fighting other aircraft
Guidelines for Vehicle Commanders
Commanders have the most important role within a vehicle. Here are some general tips to become a more effective commander:
- Prioritize threats. Pick the target that poses the highest threat to your vehicle and crew. Eliminate it and make your way down the food chain.
- Avoid skylining the vehicle on mountaintops and hilltops, especially on open maps.
- Use your intuition to predict where the enemy may be. Do your best to ensure your crew is not surprised.
- Avoid moving in straight lines if in combat. This makes it easy for enemies to lead their shots on you!
Some tips for directing the driver:
- Do not order the driver to move through an area with known hostiles quickly. Allow the gunner time to eliminate the threats.
- When referencing landmarks, use compass bearings. The driver has a restricted field-of-view from their hatch.
- Guide the driver in situations where they may not be able to see all that is around them.
- Issue commands about a second before they need to be done. There may be a delay.
Some tips for directing the gunner:
- Make the gunner aware of the rules of engagement.
- Hold fire, fire at will, etc.
- Inform the gunner of the position of friendlies
- Your view from your optics are different than that of the gunner's. Remember that when identifying targets and landmarks!
Typical Threats
Ground vehicles may encounter various forms of threats while on the battlefield. Some may be vehicles, some may be infantry, or neither.
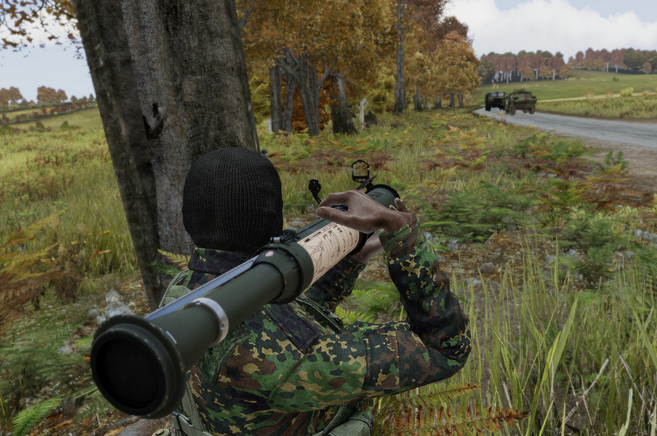
- Infantry anti-tank rockets
- AT Rocket launchers such as the AT4, RPG22, and RPG42 are unguided rockets with short effective ranges. They are compact and dangerous and can be the bane of any vehicle crew. They will not likely destroy a main battle tank with one hit, however it is possible. Lighter and medium armored targets are at increased risk.
- Anti-tank guided missiles
- ATGMs can be found on vehicles like IFVs and tanks or in static positions. ATGMs are extremely dangerous and have much longer range than unguided rockets. If an ATGM is fired at you, attempt to move into a position with a lot of cover or foliage in an attempt to cause the missile to explode before reaching you.
- Improvised explosive devices and anti-tank mines
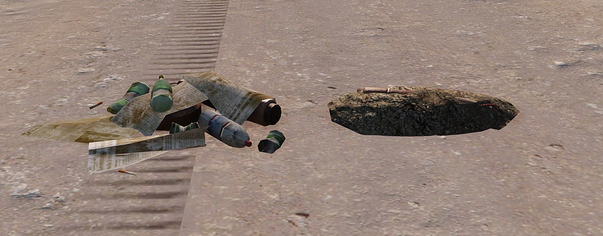
- IEDs and mines are often found on roads. If possible, engineers will clear out the roads before you advance. IEDs are often disguised as trash and other debris. Mines are often hidden underground. If you receive intelligence of mines in the area or are suspicious of their presence, it is best to avoid the roads.
Other Tips
- Hull-down, turret-down, and hide positions
- In the event of taking fire in your tank, you can hide the hull in a position where only the turret is exposed. The turret is often the most armored part of a vehicle. A turret-down position leaves vision for the commander to view over the ridge. A hide position is completely back to make sure none of the tank is exposed.
- Turning out
- Driver visibility is often poor and limited. When the situation permits, feel free to open the hatch and turn out to get a better view. Commanders also often have the ability to do so.
Logistics Skills
As a Logistician/Engineer you will be responsible for following and knowing this Standard Operating Procedure Manual (SOP Logistics main function is maintaining vehicles and equipment Engineers will also have the responsibility of disarming and arming explosives and building barricades with given tools.)
Logi Policies
- Refer to this document when you need clarification on how a tool or mechanic works or you can ask the Logistics Subject Matter Expert if you are still unsure.
- Keep the Logistic/Repair Truck maintained and safe beyond any other vehicle unless you're in imminent danger and need to repair armored Vehicles.
- Do not abuse your privileges with explosives by putting them on friendly Vehicles the only exception is right before the Operation is over if you detonate it before the classic “Mission Complete” screen is over there will be consequences.
- Distribute ammunition when it is required by going to the Repair truck checking cargo and unloading ammo boxes.
- While in convoys and the convoy stops for whatever reason Check the convoy for repairs and refueling if able. If you were not in combat then check for fuel.
Equipment
Logisticians/Engineers will be given a large array of tools due to having many tasks and although it may seem overwhelming at first, everything will be explained in this document.
- Logistics Truck: In most cases, the logistics team will be given a logistics truck or a “Repair” truck. This truck will be able to refuel and repair vehicles and store equipment such as Wheels, AT Guns, and Ammo boxes ETC, it is your responsibility to maintain this vehicle above any other. if you're in imminent danger repair a BTR or Tank, ETC. The Logistics truck is your top priority to keep safe. In convoys the Logistics truck will usually be somewhere in the middle since the truck is a heavier vehicle it is recommended you keep a 3- 2 car distance away and keep your hands on the handbrake well figuratively. When the logistic truck is given in an operation several ammo boxes will be presented near it, it is your job to ensure the correct ammo is in each box. It is possible to “Rename” the boxes I highly suggest you do so before you move it into the cargo slot for organization purposes. for example, a box with mostly 5.56 ammo can be called Rifle Ammo Box while the MG ammo box can be called MG Ammo. You can be more specific if you wish. If there isn't a type of ammo inside one of the boxes go to the Host/Command and request another box. (the logistic truck has a ton of slots so don't worry about cargo space)
- Repair Tooklit: To repair a vehicle you will need a toolkit in your backpack. When near the piece of equipment you wish to repair you will hold down the windows key and it will show options such as 'Engine',' Fuel Tank', and 'Hull' hover over this and release then you will start to repair. With the toolkit, it can only repair the yellow(50%). Around a repair truck you do the same action it will repair it fully. Full Repair is also an option with the fuel truck nearby although it takes time it will completely repair said Vehicle Hull, Engine, Wheels, and Fuel tank the only thing that the full repair does not do is refueling but the repair truck already has a refueling nozzle interaction.
- Refueling a Vehicle: To refuel a vehicle you will have to go to the repair truck using your windows key it will show interaction then 'refuel' then 'take refuel nozzle' You will then click it on the Vehicle you wish to refuel. When done use your windows key to disconnect it then return it to the repair truck. The refuel nozzle does have a short hose to it and will stop at a certain distance so try to keep the said vehicle close.
- Distribution: When the logistic truck is given in a mission several ammo boxes will be presented near it, it is your job to ensure the correct ammo is in each box. It is possible to “Rename” the boxes I highly suggest you do so before you move it into the cargo slot for organization purposes. for example, a box with mostly 5.56 ammo can be called Rifle Ammo Box while the MG ammo box can be called MG Ammo. You can be more specific if you wish. If there isn't a type of ammo inside one of the boxes go to the Host/Command and request another box. (the logistic truck has a ton of slots so don't worry about cargo space).
Tools
- Tooklit
- Defusal Kit
- Firing Device
- Trapping Kit
- Entrenching Tool
- Wirecutter
- Explosives
- Fortify Tool
Tool Descriptions
- Toolkit- The Tool Kit is what causes you to gain all knowledge on repairing Vehicles with the windows key and near a Vehicle or Turret you will be able to maintain it to the yellow level. If you have a repair truck nearby you will be able to fully repair it.
- Defusal- Kit Defusal kits well they defuse any explosives when near one you will be able to defuse that explosive with the windows key but don't get too close…
- Firing Device/Detonator- a firing device is a trigger that allows you to detonate explosives from a distance, When you put your explosives down make sure to set them to your triggering device using the Windows key.
- Trapkit-The trap kit detects explosives such as mines and IEDs at a close distance with a beeping noise the closer you are the faster it gets, it also can pinpoint them by pressing T on the explosives and a red triangle will go above the bomb showing you where it is.
- Entrenching Tool- An Entrenching tool is a shovel that allows you to create dirt barriers with superhuman speed from gigantic barriers to those small enough for one MG the entrenching tool can be a lifesaver when there is no cover and a lot of dirt on the floor.
- Wirecutter- a wirecutter cuts wires such as fences it is not required as said above but for those who don't have enhanced movement it can be useful in certain situations
- Explosives- explosives are self-explanatory… Kaboom
- Fortify Tools The Fortify tool is a tool that allows you to build barricades and watchtowers alike along with some heavy power such as AT guns and Mounted MG's the problem is it can take a long time to make.
Medical Skills
Command Skills
Scouting Skills
Hosting Skills
Events
Every event that a Host creates is considered an operation or op. Operations follow a hierarchy similar to the COC as follows:
| Event | Size | Average Duration |
|---|---|---|
| Theatre | 2-4 Campaigns | 3 Months |
| Campaign | 2-8 Operations | 1 Month |
| Operation | 1 Operation | 1 Day |
| One-Off | 1 Operation | 1 Day |
Every operation could be further categorized to set operatives' expectations.
| Op Type | Applicable Events | Definition | Notes |
|---|---|---|---|
| Contract | Theatre, Campaign | An operation that utilizes SESO TOE and PMC. | Usually part of a campaign or theatre. |
| Standard | Campaign, Operation, One-Off | Catch-all for all other types of operations. | Most common operation type. If you do not see the type of operation noted in the Host's announcements, it is most likely this. |
| FTX | One-Off | An operation focused on practicing tactics. | It usually utilizes the SESO PMC but it is not necessary. |
| OR | One-Off | An operation focused on trying new tactics or mods. | It usually utilizes the SESO PMC but it is not necessary. OR is restricted to off-days due to their unstable nature. |
Sometimes there are events that aren't operations, meaning they are not made by a Host. The only event in SESO that aren't operations are community-made Steam Workshop missions. These can vary depending on the mission itself.
Setting Up The Server
Setting up your mission is rather simple, but it is easy to miss a step and create server issues, so reference this when encountering any problems with getting your mission up.
Steps:
- Click on the mods header and download the mods pertaining to your operation, if they are not already present on the server. (Which would be everything already on the base CUP mod-list.)
- Contact someone with access to the server box, Pickle, Sag, or Ryder, to have the mods you downloaded lowercased. NOTE: This needs to be done after downloading mods or the server will not be able to run your mission, it is very important.
- After downloading all the mods and having someone lowercase them. Head to the dashboard and create a server by either cloning from a template or clicking “Add new server” to create a server for your mission. (Cloning from the template will add most of the mods you need to run your operation.)
- Click on your server and apply any of the mods that you need for your operation, be sure to have this done accurately or your mission may not work.
- After doing this head to the missions header and upload your mission .PBO which can be found in your “mpmissions” folder (path here.) If you cannot find your file make sure you have it exported to multiplayer missions by clicking so in the Eden editor (include picture below)
- Head back to your server and add the mission to the Rotation of your server, then click save.
- After doing this you may set an admin password of your liking or keep the original in the settings tab. Finally, ensure you have the following settings in the image below to allow the server to properly function without issues. (image below of standard settings tab.)
- Lastly, click start to start the server and wait for “Online” to appear on the status to left before connecting. If you have followed all the steps mentioned you may still very well encounter issues and that is why testing your mission before step-off is vital for your operation. After starting the server ensure you can connect and the mission runs correctly before waiting to your operation date. You should begin the testing process as soon as possible, after your mission is done. Give yourself at a minimum 24 hours before Operation step-off to test your operation that way you are not encountering issues adhoc.
- Now with all these steps complete, wait till it is time and start the server and begin your operation!
Note: In addressing issues with the server/mission, you can look to the Logs header on the server panel to get logs of the server during a crash, bug, etc. Furthermore, it is suggested that if you are ever stumped in fixing issues with the server contact the Chief Operations Officer (COO) or ask the advice of other Hosts to help you get your mission working.
Announcements
- In Operation-making an announcement is vital to attendance. The earlier and more frequent your announcements are, the more likely you are to maximize your attendance. (Announce at your discretion of course, no one wants a million pings.)
- Try to announce about 6-7 days in advance to give proper notice.
- Give reminders every few days and especially on the day of the Operation.
- make events
Make wiki on procedure of making an entire Op.
- Plus checklist
- no adding roles adhoc ex: jacks with sniper rifle role –> every role you want playable should be on the roster
- As a operative you are expected to use the framework
- Note about making sure to give elements what they need i.e. Logisticians need their loggie vics
- As soon as your Operation
Start-up Procedure
Refers to the period in which briefing is conducted and Operatives gather equipment from the arsenal and organize at the beginning of an Operation.
“chopping block” –> which roles to get rid of when you have less than you were expecting in attendance –>
| Time | Phase | Phase Description |
| —- | —- | —- |
| 5 min | 1 | Zeus gives briefing to Operation leadership as soon as possible. |
| 5-10 min. | 2 | Operation leadership makes plans for the Op and disseminates to other Operatives. |
| 15-20 min. | 3 | Operatives and Leadership gather equipment from the arsenal and organize. |
Note: During this period, a Zeus should make sure to remind leadership and operatives of any equipment that is pertinent/required for the operation. The Zeus should not wait on cues from Leadership or other Operatives to begin their briefing, and the Zeus should nudge leaders to start their own planning and briefing as soon as possible afterward. It is very important as a Zeus to keep the beginning of an Operation moving: if an op starts slow or takes too long to prepare operatives will get restless. Conversely, if the beginning of your op is not methodical and moves too quickly you may forget key aspects (important equipment, briefing/planning, etc.) Finding this balance is vital to Operation-making.
Mid-Operation Procedure
Ticket issues? [player, 1] call BIS_fnc_respawnTickets; (If a player has lost all their tickets and you wish to give them one back utilize this script in the __ after clicking on the player.)
Feed-back
Feedback is your opportunity to gauge the experience of the players and use this knowledge to improve your future-operations. Note the continued problems people have with your operations regardless of your ability to fix them, issues with the server are still important so they can be avoided next time.
Discord
#scheduling channel is for reserving a date for your actual Op and to ensure there are no conflicts. Just state you are taking the date for an op in the channel and other hosts will note that accordingly.
#host-general is just for general Operations-Host chatter.
When announcing an Op do so in #operations and make sure to include these three things:
A: Which mod-list you are using.
B: When. (Use HammerTime to make those in 30 minutes posts. ) https://hammertime.cyou/
C: Where the roster is. To create a roster go to the #bot-commands channel and enter !ao “Your Campaign/Operation” 1694642400
[!ao] is to add an operation. [“Your Campaign 1”] Is the name of your campaign/operation. [1694642400] Are the numbers, which can be found on HammerTime, that signify the date and time of the Op.
Here is an example of how you add slots once the channel is created with the bot: !addslots 1 Popinjay 6: Captain, First Mate [Critical]. Popinjay 1: Officer [Critical], Pirate, Pirate, Pirate, Pirate. Popinjay 2: Officer [Critical], Pirate, Pirate, Pirate, Pirate.
(this also is outdated and needs to be updated with adding modlists etc ^ )
also I have a note about using the end mission module so OCAP works properly
Setting Up Your Mission
The S.E.S.O. framework…
Team Composition
- 5-6 Team-members per team: 1 engineer, 1 TL
- No RTO in the team –> maybe Squad RTO
- Medics are separated
- Cav
- Recon (Sleepy Raccoon)
- Include example composition possible have a fire and maneuver element?
(Include image)
- Step-off
- Start time
Legacy
All guides for playing Arma 3 are available here.

